Bookmarks
Bookmarks are used to flag addresses of interest in a Program. Each Bookmark consists of an
address, a type, a name, a category (optional), and a description (optional). Bookmarks may be
organized using the category field. Ghidra places various Bookmark icons in the Marker Margin of the Code Browser to indicate locations of
defined bookmarks. The tooltip (shown when the mouse hovers over the Bookmark icon in the
Marker Margin) shows the Bookmark's type and comment.
The type refers to how the bookmark was added. Ghidra supplies five types of bookmarks:
| Bookmark Types |
| Type (icon) |
How Bookmark is Added |
Navigator Color |
Note  |
Added via the Note Bookmark
dialog; Notes are intended to be user-defined only. |
Purple |
Info  |
May be added by a plugin to mark an address of interest. |
Cyan |
Analysis  |
Added during the Auto Analysis process.
Indicates automatic changes which have been made to the program (e.g., code found,
address tables, etc.). |
Orange |
Error  |
Added by the disassembler or Auto Analysis process when an
unexpected condition is identified at a specific address (e.g., bad
instruction). |
Red |
Unknown 
|
Represents a custom Bookmark type which was added by a plugin not
currently configured into the tool. A properly designed plugin will assign a custom
icon and color to its custom type.
|
Magenta
|
Ghidra also places a marker for the bookmark in the Navigation Margin of the
Code Browser. Clicking on the Navigation Margin causes the Code Browser to go to that address,
and centers it in the browser.
The following paragraphs describes the Bookmarks
window, and how to add and remove bookmarks.
Add a Bookmark (in the
CodeBrowser)
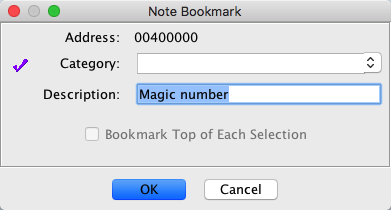
To add a Note Bookmark,
- Position the cursor at an address
- Right-mouse-click in the Code Browser, select Bookmark
- The Address field on the Note Bookmark dialog shows the location where
the bookmark will be added
- Enter a Category (optional) or choose an existing one from the combo box
- Enter a Description (optional); if an end of line comment exists at this
address, then this text becomes the default description of the bookmark, as shown in the
image above.
- Click on the OK button.
 When adding a bookmark with multiple selections in the
Code Browser, the Bookmark Top of Each Selection checkbox is both enabled and selected by default.
Leave the checkbox selected to create a bookmark at the start of each address range in the
selection. Deselecting the checkbox will cause the bookmark to be created at the cursor
location.
When adding a bookmark with multiple selections in the
Code Browser, the Bookmark Top of Each Selection checkbox is both enabled and selected by default.
Leave the checkbox selected to create a bookmark at the start of each address range in the
selection. Deselecting the checkbox will cause the bookmark to be created at the cursor
location.

Before Adding Bookmarks to Selection
|
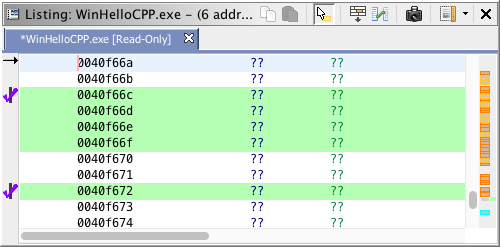
After Adding Bookmarks to Selection
|
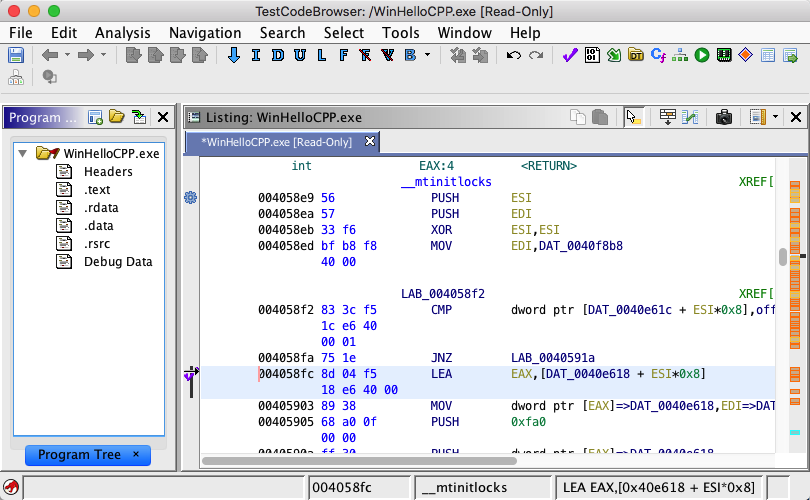
The following image depicts the Code Browser with Bookmarks. Notice the checkmarks in the
Marker Margin on
the left and the markers in the Navigation Margin on
the right.
Remove a Bookmark (in the
CodeBrowser)
To remove a bookmark,
- Position the cursor on the address of the bookmark to be deleted
- From the Marker
Margin, right-mouse-click, select Delete Bookmark
 <type>: <description>
Bookmarks Window
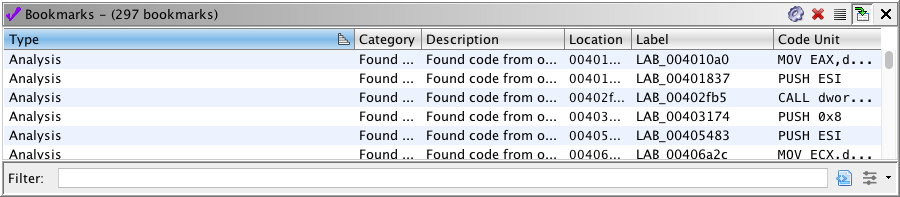
The Bookmarks window lists all of the bookmarks within a Program, including the
bookmark type, category, description, address, label, and code unit where the bookmark was
placed. Click on a Bookmark to navigate to the selected address in the Code Browser.
To display the Bookmarks window, click the bookmark icon in the Code Browser toolbar, or select the Window Bookmarks option from the menu.
Each of the columns may be sorted by clicking on the header. The sort graphic illustrates
which column is being sorted on, and whether it is ascending ( ) or descending (
 ). In the image above, the Preview column is
sorted in ascending alphabetical order. By default, the bookmarks are sorted in ascending
order by the Type column.
). In the image above, the Preview column is
sorted in ascending alphabetical order. By default, the bookmarks are sorted in ascending
order by the Type column.
In the Bookmark table, only the Category and Description columns are editable. To edit entries in these columns,
double-click on the appropriate cell and begin typing. Click outside of the cell to apply the
changes. When the Category column is being edited, it shows a combo box, listing all
of the categories. Choose an existing category or enter a new one. If a new category in
entered, the combo box is updated.
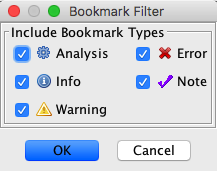
The list of Bookmarks displayed can be filtered by clicking
the Filter button  in the toolbar of the Bookmark
Window. The displayed bookmarks will correspond to the selected checkboxes in the Bookmark
Filter dialog.
in the toolbar of the Bookmark
Window. The displayed bookmarks will correspond to the selected checkboxes in the Bookmark
Filter dialog.
 You may also filter the contents of the
bookmark table by using the filter text field.
You may also filter the contents of the
bookmark table by using the filter text field.
The following describes the features available from the Bookmarks window (Note: some of
these features are also available from inside the CodeBrowser):
Edit Category
- Double click in a Category cell to display the cell editor.
- Click on the down-arrow button in the cell editor to display the list of
categories.
- Select a category from the list OR enter a new category in the cell editor.
- Press the <Enter> key or click outside of the editor.
Edit Description
- Double click on a Description cell to display the cell editor.
- Enter a new description.
- Press the <Enter> key or click outside of the editor.
Change the Sort Order
Click on the desired column header to change the sort order.
Navigate to a Bookmark
Click anywhere in the row to navigate to the bookmark.
Filter Bookmarks
- Click the Filter
 button in the local
toolbar of the Bookmarks window to display the Bookmark Filter dialog.
button in the local
toolbar of the Bookmarks window to display the Bookmark Filter dialog.
- Configure filter information.
- Click on the OK button.
If you have turned off some of the filter types, then the filter icon will show
a checkmark ( ).
).
You may save the settings of the bookmark
filter dialog by saving the tool.
In addition to filtering on the type of bookmarks you
may also filter the contents of the bookmark table by entering text into the filter text
field found at the bottom of the bookmark table. This filter will include only those
Bookmarks whose Category or Description contain the specified text. For example, to show
only the entry point bookmarks, you would enter "entry" in the filter field. The results
would show only those bookmarks with a Category or Description containing the word "entry".
The text filter is not case sensitive, nor does it support regular expressions.
Reorder Columns
Reorder columns in the Bookmarks window by dragging the column header to another position
in the table.
Make Selection in the Code Browser
- Select one or more rows in the Bookmarks table.
- Click the Select Bookmark Locations
 button in the local toolbar.
- The corresponding addresses are selected in the browser.
- Navigate to the selected addressed by using the navigation buttons (
 ,
,  ) on the main tool bar.
Remove Bookmarks
- Select one or more rows in the Bookmarks table.
- Hit the <Delete> key, or press the icon on the Bookmarks toolbar, or right mouse click and
choose the Delete option.
Dismiss the Bookmarks Window
Click the Dismiss button to exit the Bookmarks window.
Provided by: Bookmarks Plugin
Related Topics: