Disassembly
Disassembly is the process of translating bytes into assembly language instructions.
Ghidra supports three different disassembly actions:
Disassembly
Disassembly starts disassembling at the current cursor location. After
disassembling an instruction, it examines all possible execution flows from that instruction
and disassembles at all those locations.
When disassembling in a selection, the disassembly starts at the first undefined byte
within the selection. After exhausting all possible flows from the instruction,
disassembly begins again at the next undefined byte within the selection.
To perform Disassembly:
- Place your cursor at the target instruction
- Right-mouse-click
- Select Disassembly
The disassembly progress is displayed in the progress status area (bottom right) of the
tool. The progress status area displays the number of instructions disassembled and
provides a "Cancel" button. Press the "Cancel" button to stop the disassembly
process. Note: this will not undo any disassembly that has already occurred.
 Press the 'D' key to Disassemble starting at the
current cursor location.
Press the 'D' key to Disassemble starting at the
current cursor location.
Selecting Undo will return the disassembled instructions to
undefined bytes.
 Be aware that some processors may allow for
disassembly in different modes (eg: ARM vs. THUMB). Specific commands may be provided for
these and are not discussed here.
Be aware that some processors may allow for
disassembly in different modes (eg: ARM vs. THUMB). Specific commands may be provided for
these and are not discussed here.
Disassembler Options
The following Disassembler options exist which control certain behaviors during
Disassembly:
- Mark Bad Disassembly - places an error bookmark on any instruction or
instruction flow which fails to disassemble due to parse error or instruction conflict
(Enabled by default).
- Mark Unimplemented Pcode - places a warning bookmark on any instruction
which has unimplemented pcode/semantics at the time disassembly was performed
(Enabled by default). The MarkUnimplementedPcode script may be run to update
these warnings since processor language updates may implement previously unimplemented
instruction pcode.
- Restrict Disassembly to Executable Memory - If enabled will restrict
disassembly to those memory blocks marked as executable (Not restricted by default).
The above Options may be changed via the program Options dialog which allows various
program properties to be examined or modified. This dialog may be accessed via the menu action Edit Options for ... for the currently active program. These
options are program specific and stored within the program database. The above program
properties can be accessed by clicking the Disassembler node within the
Properties tree. Any changes to these options will be stored when the OK or
Apply button is clicked within the dialog.
Options for ... for the currently active program. These
options are program specific and stored within the program database. The above program
properties can be accessed by clicking the Disassembler node within the
Properties tree. Any changes to these options will be stored when the OK or
Apply button is clicked within the dialog.
These option settings will be utilized for both forced disassembly and during
auto-analysis.
Static Disassembly
The difference between Disassembly and Static Disassembly is that Static
Disassembly does not follow flow and only disassembles one instruction. However, when
disassembling in a selection, the disassembly starts at the first undefined byte within the
selection and proceeds sequentially to the last byte.
To perform Static Disassembly:
- Place the cursor in the Code Browser on an undefined byte
- Right-mouse-click
- Select Disassemble (Static).
The disassembly progress is displayed in the progress status area (bottom right) of the
tool. The progress status area displays the number of instructions disassembled and
provides a "Cancel" button. Press the "Cancel" button to stop the disassembly
process. Note: this will not undo any disassembly that has already occurred.
Selecting Undo will return the disassembled instruction to
undefined bytes.
Restricted Disassembly
Restricted Disassembly is similar to Disassembly, except that only bytes in
the current selection can be disassembled. Flows will be followed only if they are in
the current selection. If there is no selection, only one instruction will be
disassembled.
To perform Restricted Disassembly:
- Place the cursor in the Code Browser on an undefined byte.
- Right-mouse-click, and select Disassemble (Restricted).
The disassembly progress is displayed in the progress status area (bottom right) of the
tool. The progress status area displays the number of instructions disassembled and
provides a "Cancel" button. Press the "Cancel" button to stop the disassembly
process. Note: this will not undo any disassembly that has already occurred.
Selecting Undo will return the disassembled instruction to
undefined bytes.
Disassemble ARM / Thumb
Disassemble ARM and Disassemble Thumb actions will only be available if the program you are
working with is an ARM based processor. ARM processors have two states, ARM and Thumb
mode. The instructions available in ARM mode are 4 bytes long. In Thumb mode, the
instructions are "generally" 2 bytes long. ARM and Thumb mode are mutually exclusive,
the processor is either executing Thumb encoded instructions or ARM encoded
instructions. However, certain branching instructions can cause the processor to switch
modes. The default mode for disassembly in an ARM program is to disassemble in ARM
mode. If you come across a section of Thumb code that has not been disassembled,
Disassemble Thumb will set the disassembler into Thumb mode and begin disassembly.
The actions work exactly like Disassemble in that they start disassembling at the
address under the cursor, and will follow the execution flow.
To perform Disassemble ARM or Disassemble Thumb:
- Place the cursor in the Code Browser on an undefined byte.
- Right-mouse-click, and choose the appropriate option for the mode you believe the
processor is using at the address.
The disassembly progress is displayed in the progress status area (bottom right) of the
tool. The progress status area displays the number of instructions disassembled and
provides a "Cancel" button. Press the "Cancel" button to stop the disassembly
process. Note: this will not undo any disassembly that has already occurred.
Press the 'F11' key to Disassemble in ARM
mode and press the "F12" key to disassemble in Thumb mode.
Selecting Undo will return the disassembled instruction to
undefined bytes.
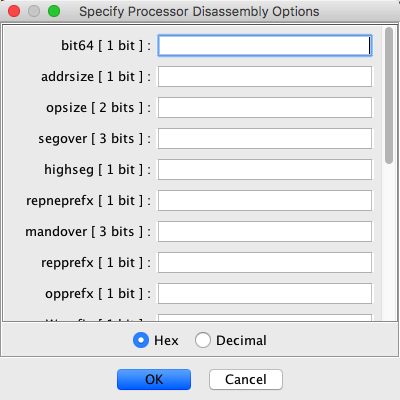
Processor Options
Some processors have "modes" or state information that affects how they will interpret and
execute the bytes that make up an instruction. To support this, Ghidra creates a pseudo
register called the "contextRegister" that contains bits corresponding to the different modes
or options of the processor. The language specifies a default for these modes, but the
user can effectively change the defaults using the Processor Options dialog.
The options are
specific to the processor and the user should refer to the processor manual for a description
of a processors modes. Whenever, disassembly takes place these are the assumed values that
will be used to initiate disassembly, unless the user has specifically set the values at an
address using the Register
Manager Window.
To changes the default processor options:
- Place the cursor in the Code Browser.
- Right-mouse-click, and select the "Processor Options" menu item.
- Enter the values and press the "Ok" button.
Provided by: Disassembler plugin
Related Topics:
Modify Instruction Flow
With certain processors and situations it may be desirable to modify the default
flow of an instruction to better reflect the nature of its flow. For example a jump may
actually be performing a call type operation, a call may be performing a long-jump.
This distinction primarily affects the subroutine models and flow analysis performed
within Ghidra.
The following basic flow types may be imposed upon the default flow of an instruction:
- BRANCH
- CALL
- CALL_RETURN
- RETURN
In all situations the conditional nature of the original flow is perserved.
To Modify Instruction Flow:
- Place the cursor on an instruction within the Code Browser. Note that
instructions which are purely fall-through can not be modified.
- Right-mouse-click
- Select Modify Instruction Flow... menu item.
- Within the Modify Instruction Flow dialog select the desired basic flow
behavior.
- Click OK in the dialog
An instruction whose flow has been
modified will have its' mnemonic color modified.
Modify Instruction Length
There are certain situations where code may flow into an offcut location within the
middle of another instruction where the bytes happen to form a different instruction.
While this generally indicates a bad flow, this can also be a legitimate situation
of an overlapping instruction. For example, with x86 instructions where a flow
may bypass a LOCK prefix byte. Depending on which flow disassembles first, the situation
may manifest differently. Below is an example of the x86 LOCK prefix case. This situation can be
quickly identified by the error bookmark along with the offcut reference. In this case the
JZ instruction has two flows: 1) one falls-through and 2) conditionally jumps
around the LOCK prefix byte resulting in an offcut flow and disassembly conflict.
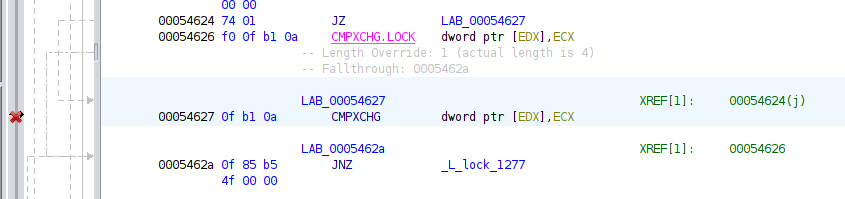
The above case can be resolved by overriding the code-unit length of the first
instruction to 1-byte allowing the incomplete disassembly of the offcut instruction
to be repaired.
- Place the cursor on an instruction within the Code Browser (e.g.,
CMPXCHG instruction).
- Right-mouse-click
- Select Modify Instruction Length... menu item.
- Within the Modify Instruction Length dialog enter the reduced instruction
length (e.g., 1 in this case). Note that this does not impact the number of bytes
actually parsed, but only the affective code unit length.
- Click OK in the dialog
- This should result in the subsequent locations becoming undefined code units
which can know be disassembled. Click on the first undefined location and disassemble
(i.e., D key binding).
- You may also delete the error bookmark which should no longer be relavent.
The image below shows this same code after these length override steps have been
performed. The fallthrough of the first instruction, whose length was overriden from four
to one, is preserved and both instructions fallthrough to the same JNZ
instruction.