The Function Comparison window provides a way to compare two or more functions in a simple side-by-side panel.
To begin, select a function (or multiple functions) from the listing or the function table. Then right-click and select the Compare Selected Functions option.
A new function comparison window will appear (subsequent invocations of this option will create a new tab in the existing window).
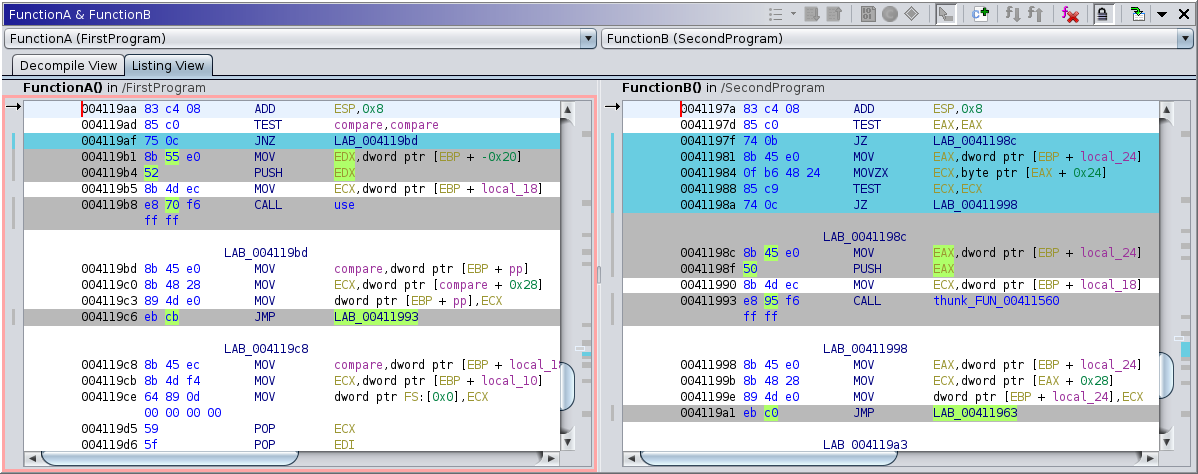
The Listing View shows a pair of listings side by side so the functions can be compared. The highlights in the two listings indicate where there are possible differences in the bytes and instructions between the functions. The background highlights that have a default color of gray are where bytes or instructions differ wherever the instructions could be matched up between the two functions. The code units with white background also have a matching code unit in the other function but do not have any differences based on the current difference settings. Any instructions that couldn't be automatically matched up are highlighted with a default background color of blue. The detailed differences with a default background color of light green within the gray difference code units indicates individual bytes and parts of instructions that differ between a code unit in one function and its matching code unit in the other function using the current difference settings.
The user can change these colors from the Properties action in the popup menu of the Listing View or from the Listing Code Comparison entry in the Tool Options.
Indicator Default Color Description Unmatched Code Units Highlights where the code from one listing didn't get matched up with code from the other listing. Differing Code Units Highlights where matched code units have one or more detailed differences currently being detected. Byte Differences Highlights bytes that differ between matched code units in the two listings. A toolbar action toggles whether or not these are being detected. Mnemonic Differences Highlights mnemonics that are different between matched code units in the two listings. Operand Differences Highlights operands that are different between matched code units in the two listings. Toolbar actions toggle whether or not these are being detected for constants or registers.
If you move the cursor within one of the listings, if possible it will move the cursor to the matching location in the other listing. Scrolling one listing will scroll the other. The two listings are locked together for scrolling at the code unit where the cursor last had a matching code unit in the other listing. In other words as the cursor moves within the code units that have white and gray backgrounds, the cursor in the other listing will also move to the matching code unit. When the cursor moves into a code unit that is unmatched (with a default blue background), the cursor in the other listing will not move since it doesn't have a matching code unit.
Cursor Arrow
The left side margin of each listing can display a cursor arrow
that indicates the code unit with the current cursor location. In the active side of the dual listing, the cursor arrow will always display to indicate the current cursor location. The inactive side of the dual listing will also show the cursor arrow whenever its matching location was able to be determined. If the active side's cursor location is on an unmatched code unit then the other side's cursor arrow will not appear.
Whenever the cursor arrow appears and there isn't already another background color, the code unit background will be highlighted light blue to help you determine where the red location cursor is located in the listing. If the cursor is on a code unit with an indicated difference or an unmatched instruction then that associated background color will take priority and will display instead of the light blue highlight.
Listing Layout Actions
There are actions in the toolbar that control the layout of the two listings in the Listing View. One controls the orientation of the two listings relative to each other. Another displays the header for adjusting the field sizes and positions in the listing.
Toggle Format Header
The two listings which display each of the functions can show numerous fields and those fields can be sized and positioned relative to each other in the way a user desires. The display fields can be changed from the Field Header in the same way they can be adjusted in the CodeBrowser. To change the fields in the listing,
- Select the menu icon
on the far right end of the toolbar.
- From the menu that is displayed choose Toggle Format Header.
This will display the Field Header above the left Listing. For more information on how to manipulate the fields, see the help for the Code Browser Header.
Show Listings Side-by-Side
The two listings which display each of the functions can be displayed side by side or one above the other. To change how the two listings are positioned relative to each other,
- Select the menu icon
- From the menu that is displayed choose Show Listings Side-by-Side.
This switches the layout of the two panels for the functions from side-by-side (left and right) to one above the other (top and bottom). Each time you select this option, the layout will switch between these two layouts.
Navigating Differences
There are actions in the toolbar that allow you to navigate to the next or previous difference block (default gray background) or unmatched code unit block (default blue background). There is also a choice icon that indicates whether you want to navigate to the unmatched code unit blocks, the difference blocks, or both types of blocks.
There is a pink border around one of the two listings to indicate which of the two side's blocks are being navigated.
Next/Previous Area Marker
The Next/Previous Area Marker allows the user to choose the type of highlighted areas that you go to when navigating.
The Function Comparison window has a navigation choice icon with a small triangle
Both - Navigates to the next/previous highlight area whether it is an unmatched code unit block or a difference block.
Unmatched Code Units - Navigates between unmatched code unit blocks.
Differences - Navigates between difference blocks.
Go To Next Highlighted Area
The Listing View provides an icon (
) on the tool bar to go to the next highlighted area in the listing window.
- Right mouse click and select the
If there is another highlighted area to go to then the location cursor will move to that highlighted block. If there aren't any more highlighted areas below the current location, a message is displayed in the tool's status area to indicate this.
The Next/Previous Area Marker allows the user to choose the type of highlighted areas that you go to when navigating.
Go To Previous Highlighted Area
The Listing View provides an icon (
) on the tool bar to go to the previous highlighted area in the listing window.
- Right mouse click and select the
If there is another highlighted area to go to then the location cursor will move to that highlighted block. If there aren't any more highlighted areas above the current location, a message is displayed in the tool's status area to indicate this.
The Next/Previous Area Marker allows the user to choose the type of highlighted areas that you go to when navigating.
Difference Settings
There are several actions in the toolbar that control the highlighting of code unit differences between the functions in the two listings. More specifically, byte and instruction differences. Each of the action descriptions that follows explains how that action affects the difference highlighting in the listings.
Ignore Bytes
The ListingView has an icon (
) on the tool bar to ignore byte differences in the listing window. Selecting the toolbar button causes byte differences to be ignored within the two listings. In other words, they won't be highlighted. When ignoring byte differences the toolbar icon will look as though it is pressed inward and will have a
in the upper left corner.
When byte differences are being displayed, do the following to now ignore bytes in the differences.
- Right mouse click and select the
- A
Clicking the Ignore Bytes while it is ignoring byte differences will change it back to determining byte differences.
Ignore Operand Constants
The Listing View has an icon (
) on the tool bar to ignore differences in operand constants when comparing instructions in the listing window. Selecting the toolbar button causes differences in operand constants to be ignored within the two listings. In other words, they won't be highlighted. When ignoring differences in constants the toolbar icon will look as though it is pressed inward and will have a
When operand constants differences are being displayed, do the following to now ignore operand constants differences when comparing instructions.
- Right mouse click and select the
- A
Clicking the Ignore Operand Constants while it is ignoring differences of operand constants will change it back to determining differences of operand constants.
Ignore Operand Registers
The Listing View has an icon (
) on the tool bar to ignore differences in operand registers other than register size when comparing instructions in the listing window. Selecting the toolbar button causes differences in operand registers other than size to be ignored within the two listings. In other words, they won't be highlighted. When ignoring differences in registers the toolbar icon will look as though it is pressed inward and will have a
When operand register differences are being displayed, do the following to now ignore operand register differences when comparing instructions.
- Right mouse click and select the
- A
Clicking the Ignore Operand Registers while it is ignoring differences of operand registers will change it back to determining differences of operand registers.
Listing Code Comparison Options
These are the tool options that can be adjusted for the dual listing view of a Function Comparison.
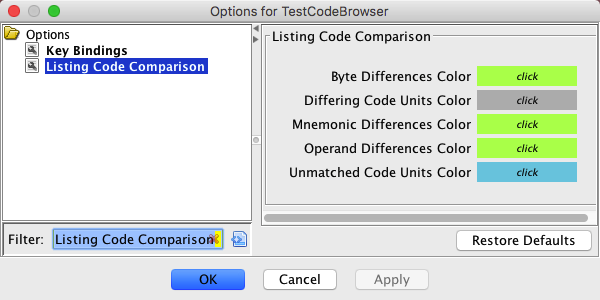
The Byte Differences Color option sets the highlight color for bytes that differ between matched code units in the two listings.
The Differing Code Units Color option sets the background highlight color of matched code units with one or more detailed differences currently being detected.
The Mnemonic Differences Color option sets the highlight color for mnemonics that differ between matched code units in the two listings.
The Operand Differences Color option sets the highlight color for operands that differ between matched code units in the two listings.
The Unmatched Code Units Color option sets the background highlight color where the code from one listing didn't get matched up with code from the other listing.
The Decompiler Diff View shows a pair of decompilers side by side. Individual tokens can be highlighted in various colors to show differences and matches between the two functions. The default colors are described in the following table; users can change these colors from the Properties action in the popup menu of the Decompiler Diff View or from the Decompiler Code Comparison entry in the Tool Options.
Decompiler Code Comparison Options
Indicator Default Color Description Differing Tokens Highlights (eligible) tokens in each decompiled views which do not have matches in the other function. Ineligible Tokens This color is used to highlight a focused token when it is not eligible for a match via the matching algorithm. For example, whitespace tokens and variable declarations are never assigned matches. Matched Tokens If the focused token has a match in the other function, all tokens involved in the match are highlighted in this color. Unmatched Tokens This color is used to highlight the focused token when it is eligible for a match but does not have one.
Synchronized scrolling works by matching a line in one decompiled function with a line in the other decompiled function. The two functions are aligned relative to the matched line; scrolling up or down will then move each decompiled function by the same amount. Whenever you click on a token, the functions are re-aligned. If the token you clicked on has a match, the functions will be re-aligned using the corresponding line. If the token does not have a match, a search is performed for the nearest token in the same function which does have a match, and the functions are re-aligned using the search result.
Decompiler Code Comparison Actions
Compare Matching Callees
This action is available on matched tokens corresponding to function calls. It will open a new function comparison window populated with the called functions.
Show Decompilers Side-by-Side
This toggles the decompiler panels between a vertical split and a horizontal split.
Toggle Exact Constant Matching
This toggles whether or not constants must be exactly the same value to be a match in the Decompiler Diff View.
There is no limit to the number of functions that can be compared. Users may add and remove functions from each comparison panel as desired. Simply use the pulldowns above the listing panels to change what is being compared.
The following toolbar options are available:
Add To Existing Comparison
Allows the user to add functions to the current comparison window. When selected, the following table containing all functions in the current program is displayed:
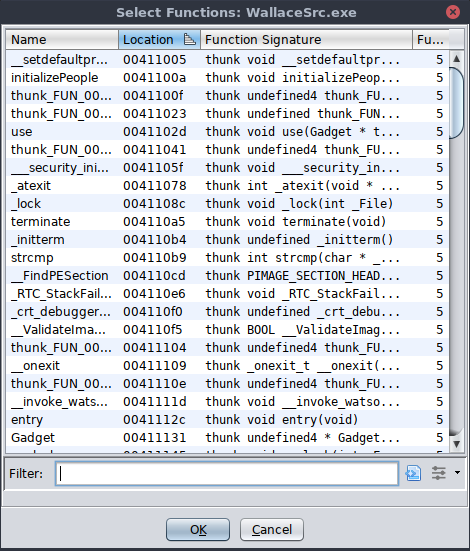
Select the functions to be added and hit the OK button; the selected functions will be available in both the left and right sides of the comparison window.
Remove Function From Comparison
Removes the function in the focused panel from the comparison. This will remove the function from both the source and target selection pulldowns.
Go To Next Function
Navigates to the next available function in the selection pulldown
Go To Previous Function
Navigates to the previous available function in the selection pulldown
Navigate To Selected Function
When toggled on, the function comparison panels become navigable, meaning a mouse click on the panel or change in the function being viewed will result in a GoTo event being generated. This allows other panels (eg: the listing) to update their views accordingly.
Other Function Comparison Actions
The following are additional actions that are available in the Function Comparison window.
Toggle Mouse Hover Popups
If you hover the mouse over a reference in either listing A popup window will appear showing a listing at the part of the program being referenced. You can also hover over a field in the listing that contains truncated text, which will show you the entire text in a popup. You can turn the hover popup windows off using the
mouse hover button in the toolbar.
- Selecting the
.
- Selecting the
Synchronize Scrolling of Dual View
If the
button is showing in the toolbar then the dual listing or dual decompiler will synchronize scrolling of the left and right function in their views. Scrolling or moving the cursor in one side will cause the location in the other side to also scroll or move if a matching location can be determined.
When the
button is showing in the toolbar the left and right sides of the dual listing or dual decompiler will scroll independent of the other side.
- Selecting the
- Selecting the
Apply Actions
These actions apply information from the other function to this function. Currently, the following apply actions are provided:
- Apply Function Name - This will apply the function name and namespace of the other function to this function.
- Apply Function Signature - This will apply the function name, namespace, and the function signature. Note that this action copies a limited form of the signature where structures and unions are not copied, but instead empty placeholders are created.
- Apply Function Signature and Data Types - This will apply the function name, namespace and full signature, including any complex data types and referenced types. Use this action with caution as it can potentially add many inappropriate and conflicting data types, especially if the source function is from a program with a different architecture or compiler.
Provided By: FunctionComparisonPlugin