The import options differ depending on the selected format.
These options appear in many of the standard executable program formats such as ELF, PE,
etc.
Apply Processor Defined Labels
If this option is on, the importer will create processor labels at specific addresses
as defined by the processor specification. This is usually used to label things like the
reset vector or interrupt vector.
Anchor Processor Defined Labels
If this option is on, labels created from the processor specification are
anchored. This means that if the image base is changed or a memory block is moved,
those symbols will remain at the address they were originally placed. If the option is
off, the symbols will move with the image base or the memory block.
Link Existing Project Libraries
Searches the project for existing library programs and creates external references to
them.
Project Library Search Folder
The project folder that will get searched for existing library programs. If left
empty, the folder that the main program is being imported to will be searched.
Load Local Libraries From Disk
Searches the executable's directory to recursively resolve the external libraries used
by the executable. The entire library dependency tree will be traversed in a depth-first
manner and a program will be created for each found library (if it doesn't exist already).
The external references
in these programs will be resolved.
Load System Libraries From Disk
Searches a user-defined path list to recursively resolve the external libraries used
by the executable. The entire library dependency tree will be traversed in a depth-first
manner and a program will be created for each found library (if it doesn't exist already).
The external references
in these program will be resolved.
The "Edit Paths" button will bring up the Library Paths Dialog
Recursive Library Load Depth
Specifies how many levels deep the depth-first library dependency tree will be
traversed when loading local or system libraries.
Library Destination Folder
The project folder where newly loaded library programs will get created. If left
empty, they will get created in the same folder as the main program being imported.
ELF format has all the Common Options, plus:
Perform Symbol Relocations
If selected, Ghidra will attempt to apply the relocations specified in the ELF
header.
Image Base
Specifies the image base to use for importing the memory sections.
Import Non-loaded Data
If selected, Ghidra will import ELF sections that don't get loaded into memory when
the program is run. These sections will not be stored in a special address space called
"other".
Max Zero-Segment Discard Size
When both section-headers and program-headers are present, this option controls the
maximum byte-size of a non-section-based memory block which has a zero-fill which will
be discarded. This is intended to allow section-alignment load sequences to be ignored
and discarded. A value of "0" will disable all such discards. The default value is
255-bytes.
The NE format has all the Common Options, plus:
Perform Library Ordinal Lookup
Looks up and applies pre-generated exported symbol ordinal name mappings and stack
purge information. This information is stored in symbol files located in
<GHIDRA_INSTALL_DIR>/Ghidra/Features/Base/data/symbols/<OS>.
If there is no pre-generated information for a given library but the ordinal name
mappings and/or stack purge information is extracted during the library load/analysis
process, the information will be cached locally to the user's .ghidra/
directory to speed up future imports.
The PE format has all the Common Options, plus:
Perform Library Ordinal Lookup
Looks up and applies pre-generated exported symbol ordinal name mappings and stack
purge information. This information is stored in symbol files located in
<GHIDRA_INSTALL_DIR>/Ghidra/Features/Base/data/symbols/<OS>.
If there is no pre-generated information for a given library but the ordinal name
mappings and/or stack purge information is extracted during the library load/analysis
process, the information will be cached locally to the user's .ghidra/
directory to speed up future imports.
 When running Ghidra with symbol files
created from an older operating system, you may receive the following warning
message:
When running Ghidra with symbol files
created from an older operating system, you may receive the following warning
message:
Unable to locate [symbol_name] in
[<filepath>.exports].
Please verify the version is correct.
This warning message indicates which symbols do not exist in the corresponding
.exports file. The only information lost by not including these symbols is
function purge and comments. If you require this information, manually delete the
.exports file and Ghidra will regenerate it.
Parse CLI headers (if present)
If selected, any CLI headers present will be processed.
Block Name
The name of the memory block that will contain the raw bytes from the file. By
default, it will be the name of the default address space (usually "ram")
Base Address
This field is the address offset for the block of bytes to be imported. By default,
this will be 0.
File Offset
This field is the byte offset into the imported file from which to start importing raw
bytes. By default, this will be 0.
Length
This field is the number of bytes to import. By default, this will be set to the total
number of bytes in the imported file.
Apply Processor Defined Labels
If this option is on, the importer will create processor labels at specific addresses
as defined by the processor specification. This is usually used to label things like the
reset vector or interrupt vector.
Anchor Processor Defined Labels
If this option is on, labels created from the processor specification are
anchored. This means that if the image base is changed or a memory block is moved,
those symbols will remain at the address they were originally placed. If the option is
off, the symbols will move with the image base or the memory block.
The XML format is used to load from a Ghidra XML formatted file. The options are simply
switches for which types of program information to import.
Memory Blocks
Imports memory block definitions (name, start address, length, etc). See Memory Map
Memory Contents
Imports bytes for the memory blocks.
Instructions
Imports disassembled instructions. See Disassembly.
Data
Imports data types and defined data. See Data Type
Manager and Data.
Symbols
Imports user-defined symbols. See Symbol Table.
Equates
Import equate definitions and references. See Equate Table.
Comments
Imports comments (pre, post, eol, plate, repeatable). See Comments.
Properties
Imports user-defined properties.
Bookmarks
Imports Bookmarks.
Trees
Imports program organizations (program trees, modules, fragments). See Program Tree.
References
Imports user-defined memory, stack, and external references. See References.
Functions
Imports functions, stack frames and variables. See Functions.
Registers
Imports program context and registers. See Register Values.
Relocation Table
See Relocation
Table.
Entry Points
Imports program entry points.
External Libraries
See External Program
Names.
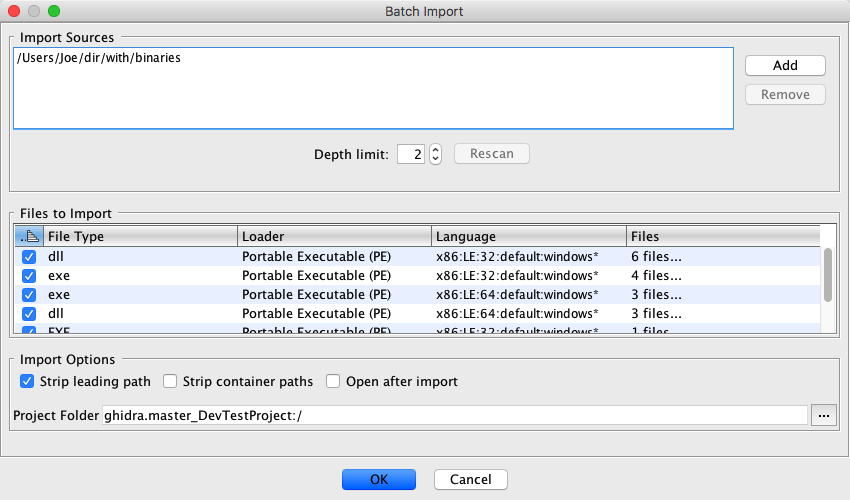
Import File... menu item.

 button to move the path up in
the list
button to move the path up in
the list button to move the path down
in the list
button to move the path down
in the list button
 The newly added path will be placed at
the top of the list.
The newly added path will be placed at
the top of the list. button
 This option will remove any paths added manually.