When working with a versioned program within a
shared project an exclusive checkout of the program project file is required to perform any
modifications to the memory map.
When working with a versioned program within a
shared project an exclusive checkout of the program project file is required to perform any
modifications to the memory map.
The Memory Map window displays a list of memory blocks that make up the memory structure of the current program. The component provides actions for adding, renaming, moving, splitting, extending, joining, and deleting memory blocks.
When working with a versioned program within a
shared project an exclusive checkout of the program project file is required to perform any
modifications to the memory map.
Ghidra supports three different block types through the Memory Map window:
File Bytes are currently only created
by importers. At this point in time there is no capability provided by the Memory Map provider to create a
new File Bytes instance.
Overlay - Each of the above memory block types may optionally be created as an Overlay block. One or more memory blocks may be defined within the same overlay address space where the Overlayed Space is reflected in the memory map table. Overlay blocks can serve various purposes where a memory range may contain different data/code at any given point in time or processor state. Note that Overlay blocks do not relocate with image base changes and have some limitations in conjunction with decompilation and analysis.
To view the Memory Map, select Window![]() Memory Map from the main tool menu, or click on the
Memory Map from the main tool menu, or click on the  icon in the tool bar. Note that the current Image Base Address is
specified within the title bar.
icon in the tool bar. Note that the current Image Base Address is
specified within the title bar.
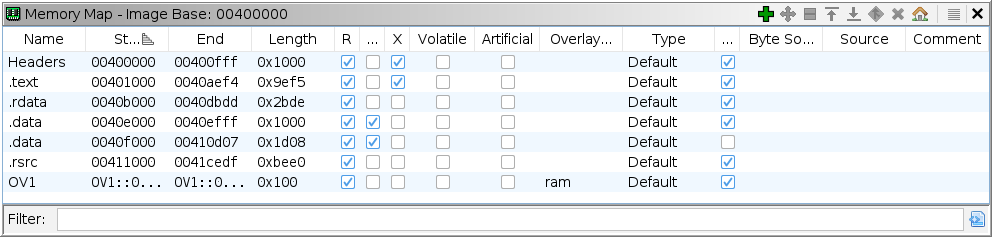
Each row displays information about one of the memory blocks. The following summarizes the information about each block.
Many of the Memory Map table fields may be
modified to alter the memory block specification (such fields are marked with an '*').
Name * - Name of the memory block.
Start - The starting address (in hex) of the memory block. For overlay blocks this will reflect an overlay address which includes the name of the overlay address space.
End - The ending address (in hex) of the memory block. For overlay blocks this will reflect an overlay address which includes the name of the overlay address space.
Length - The length (in hex) of the memory block.
R * - Indicates read permission.
W * - Indicates write permission.
X * - Indicates execute permission.
Volatile * - Indicates a region of volatile I/O Memory.
Artificial * - Indicates an artificial memory block which has been fabricated to facilitate analysis.
Overlayed Space - If the block is an overlay block this column indicates the name of the overlayed physical memory space. This field will be empty for non-overlay blocks.
Type - Indicates whether the block is a Default, Bit Mapped or Byte Mapped type of block.
Initialized * - Indicates whether the block has been initialized with values; this property applies to Default and Overlay blocks.
Byte Source - Provides information about the source of the bytes in this block. A block is made up of one or more sub-blocks. Each sub-block is listed by its type, size, and other type-specific information. For example, if the bytes were originally imported from a file, then the file name and the offset into that file is displayed. If the bytes are mapped to another region of memory, then the start address for the mapping will be displayed.
Source - Description of block origination.
Comment * - User added comment about this memory block.
An overlay address space may be renamed by selecting an overlay block within the table. Its current overlay address space name should appear as the prefix to its Start address (e.g., OV1::00001000 where OV1 is the current name of the overlay space containing the overlay block). The popup menu action Rename Overlay Space may be selected after a right-click on the selected overlay block row. This will popup a window from which the overlay space may be renamed.
Rename
Memory Blocks can be renamed by double-clicking on the name field and entering a new name.
Change Read Permission
The read permission of a memory block can be changed by left-clicking on the checkbox.
Change Write Permission
The write permission of a memory block can be changed by left-clicking on the checkbox.
Change Execute Permission
The execute permission of a memory block can be changed by left-clicking on the checkbox.
Change Volatile Setting
The volatile setting of a memory block can be changed by left-clicking on the checkbox.
Change Artificial Setting
The artificial setting of a memory block can be changed by left-clicking on the checkbox.
Initialize Memory Block
A memory block that is currently Uninitialized can be Initialized by clicking on the Initialized checkbox. A dialog will appear allowing you to enter a byte value to be used to fill the block. Deselecting the checkbox will cause the block be revert to uninitialized memory. This will have the additional side effect of removing all functions, instructions, data, and outgoing references in that block.
Edit Comment
Memory Block comments can be changed by double-clicking on the comment field and entering the new comment. The comment can be a maximum of 256 characters.
The memory block operations are available through the icons on the header of the Memory Map window, or select a block in the table, right mouse click, and choose an option.
 Add
AddSelect Add to bring up the Add Memory Block dialog. Fill in the requested information and select the OK button.
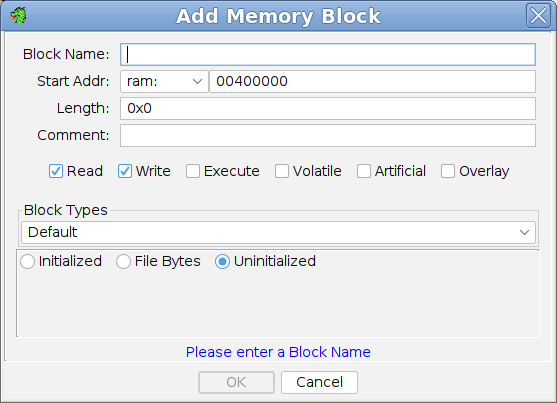 |
Block Name - Enter the name of the new memory block.
Start Addr - Enter the start address of the new memory block. If the program language defines multiple address spaces, the address space must also be specified. The address space selection will not appear if only one is defined. If creating an overlay memory block within an existing overlay address space that space should be selected. A block within the default address space may not span across the current Image Base Address.
Length - Enter the length of the new memory block.
Comment - Enter a comment for the block if desired.
Read - Sets the read permission.
Write - Sets the write permission.
Execute - Sets the execute permission.
Volatile - Marks a block as volatile I/O memory.
Artificial - Marks a memory block as artificial. This may be useful when a block is required to facilitate analysis but does not exist in the same form within a running/loaded process state.
Overlay - Creates the block as an overlay block. An overlay memory block may be created in two ways:
- Specifying a Start Addr within an existing overlay address space (this Overlay option is redudant and ignored), or
- Specifying a Start Addr within a physical memory address space and enabling this Overlay option. This use case will force the creation of a new unique overlay address space.
Block Types - Select the block type from the combo box: Default, Bit Mapped or Byte Mapped.
- Default - A normal memory block within the processor's address space. These blocks cannot overlap any other default block. Default blocks can be one of the following types:
- Initialized - Specify a value and a new block will be created using that value for every byte in the block.
- Uninitialized - An uninitialized block will be created.
- File Bytes - Select from a list of imported files and enter a starting offset for that file. Those bytes will be the initial value for the block.
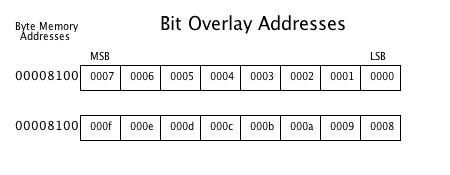
- Bit Mapped - This is a block that allows bit addressing of a section of bytes in memory. For example, the first bit of the byte at memory location 0x1000 might also be addressed as BIT:0. The second bit at the same byte would then be addressed as BIT:1 and so on.
The illustration below depicts a Bit Mapped block of Length 16 with a Start Addr of (BIT:) 0000, and a Source Address of 00008100. Note that bit-mapped addresses are assigned from least significant bit to most significant bit.
This is used to model certain processors that allow this sort of addressing such as the INTEL 8051. When a Bit Mapped block is created you must specify the byte address on which the bit addressing will be based.
- Byte Mapped - This is a block that allows access to a range of bytes in memory using an alternative address. A Source Address must be specified which corresponds to the source of the actual bytes for this block, although all or part of the mapping may correspond to an uninitialized block or no block at all. The default mapping ratio is 1-byte to 1-source-byte (1:1), although other decimations may be specified using a mapping ratio. When specifying a Mapping Ratio both values must be in the range 1..127 where the right (source-byte count) value must be greater-than-or-equal to the left value (e.g., 2:4).
 |
 Move
MoveSelect Move to bring up the Move Memory Block dialog. The Move action is enabled when exactly one memory block is selected. Enter either a new start or end address to cause the block to be moved.
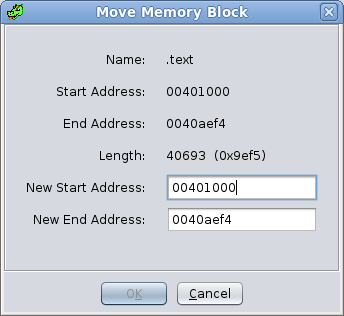 |
Name - Name of the memory block to be moved (not editable).
Start Address - Current starting address of the block to be moved (not editable).
End Address - Current ending address of the block to be moved (not editable).
Length - Length of the memory block to be moved (not editable).
New Start Address - Enter the NEW starting address for the block. The NEW ending address will be computed.
New End Address - Enter the NEW ending address for the block. The NEW starting address will be computed.
- The changes specified would result in an overlap with the original block or any other existing block.
- The block is an Overlay block.
 Split
SplitSelect Split to bring up the Split Block Dialog. The Split action is enabled when exactly one memory block is selected. Use the Split Block Dialog to split a memory block into two smaller memory blocks. There are four ways to enter the split point:
- Enter an end address for the first block (block to split), or
- Enter a length for the first block (block to split), or
- Enter a start address for the second block (new block), or
- Enter a length for the second block (new block).
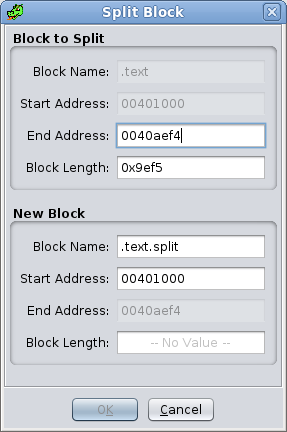 |
Block to Split
Block Name - Name of block being split (not editable)
Start Address - Start address of block being split (not editable)
End Address - New end address of the original block
Block Length - New length of original block
New Block
Block Name - Name of new block. Default name will be provided, but it can be changed by editing this field
Start Address - Start address for the new split block
End Address - End address of the original block (not editable)
Block Length - Length of new split block
 Expand
Up
Expand
UpSelect Expand Up to bring up the Expand Block Up Dialog. The Expand Up action is enabled when exactly one memory block is selected. Use the Expand Block Up Dialog to cause a memory block to grow by adding additional bytes BEFORE the memory block. The block can be expanded by either entering a new start address or a new length.
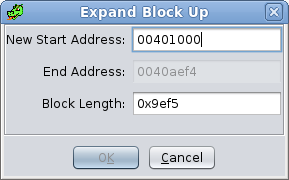 |
New Start Address - A new start address can be entered here. It must be before the current start address.
End Address - Displays the end address of the block (not editable).
Block Length - Displays the length of the block. A new value can be entered here which will cause a corresponding change in the start address.
 Expand
Down
Expand
DownSelect Expand Down to bring up the Expand Block Down Dialog. The Expand Down action is enabled when exactly one memory block is selected. Use the Expand Block Down Dialog to cause a memory block to grow by adding additional bytes AFTER the memory block. The block can be expanded by either entering a new end address or a new length.
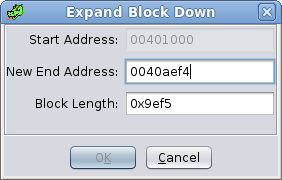 |
Start Address - Displays the start address of the block (not editable).
New End Address - A new end address can be entered here. It must be after the current end address.
Block Length - Displays the length of the block. A new value can be entered here which will cause a corresponding change in the end address.
 Merge
MergeThe Merge action is enabled when two or more memory blocks are selected. It attempts to merge all selected blocks into one block. Any "gaps" will be "filled in" with 0s.
Caution should be used because a VERY large memory block can be created if the memory blocks being merged are far apart in the address space. Ghidra will display a warning if a really large block is about to be created. Disregarding the warning may cause Ghidra to fail with an "out of memory" error.
 Delete
The Delete action is enabled when one or more memory blocks are selected. All selected blocks will be deleted. If the blocks contained defined data or instructions, a confirmation dialog is displayed; select "yes" on the dialog to delete the block. A progress dialog is displayed while the block is being deleted.
For large blocks that may contain many symbols, references, instructions, etc., the delete operation may take a while to complete. You can cancel the delete operation at any time.
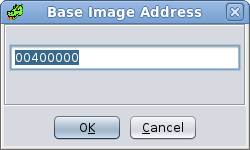
 Set Image
Base
Set Image
BaseThe Set Image Base action allows you to change the base address of a program. This action is useful when working with relocatable code such as DLLs or shared objects. All addresses, code units, references, etc. will immediately be re-based relative to the new base address.
For example, given a program base at 0x01000000 with a memory block starting at address 0x01001000. If the base address was changed to 0xeeee0000, then the new start address of the memory block would become 0xeeee1000.
To change the image base, enter a new image base in the text field and click on the OK button.
|
|
Provided by: Memory Map Plugin