Each program has a set of registers that is determined by the program's language. When a program is actually running, the registers contain values that make up the processor state at any given instant. Since Ghidra programs represent a static view (i.e. not running), there is no "instant" that can be examined to see register values. The best approximation is to assign registers values at addresses. This is useful if the register value can be determined to be constant anytime the instruction at that address is executed.
For example, if an instruction at address 0x1000 is "mov ax,20", then it might be possible to assume that the value of register ax will be 20 for the next several instructions (assuming there are no "jumps" into that code).
Setting register values can sometimes be the critical link for successfully performing various types of analysis or even getting the correct disassembly. For example, some processors have a "mode" that is stored in some register. Depending on the mode, the processor may have completely different instruction sets. To disassemble properly, the mode register must be set at the address where the disassembly begins.
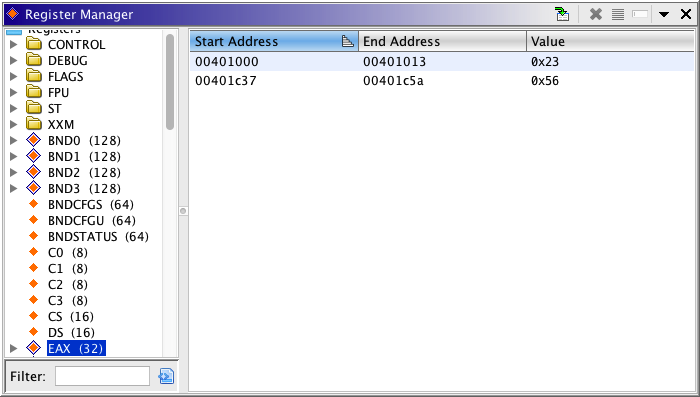
The Register Manager displays the assigned values of registers at addresses within a program.
To display the Register Manager, select the Register Manager menu item from the Window menu of the toolbar or.
The left side of the Register Manager is a tree containing all the registers defined for the program's language. If the registers have been grouped into categories by the language, those registers will appear under a folder with that group name. Registers that break down into smaller registers are marked with the
icon. These nodes can be further opened to reveal their component registers. For example, EAX can be opened to show AX, which can then be opened to show AL and AH. Registers that don't have sub pieces use the
icon. The filter text field, located under the register tree can be used to quickly find any register. As you begin to type the name of a register, the tree will shrink eliminating any registers that don't contain the filter text.
The right side of the Register Manager is a table that displays ranges of addresses that have assigned values for whichever register is selected in the register tree. Initially, the table only contains values that have been explicitly associated with the selected register and addresses. There is an option in the drop down menu that will cause the table to also show default values for a register. Default values are assigned by the language and usually only apply to context registers.
Tool Buttons
Toggles whether or not to select the row in the currently selected register value table whose address range contains the current address of the cursor in the listing view. For example, in the Register Manager image show above, if the user clicks on any address between 804c12 and 804c24, then the first row of the table will be selected if this action toggle is on.
Deletes the register value associations for all the selected ranges in the table.
Creates a selection in the browser for all the address ranges selected in the register values table.
Filters out all registers in the register tree that don't have any associated values (default or otherwise).
Menu Actions
Show Default Values - if selected, the register manager will show default register value ranges mixed in with user set register value ranges.
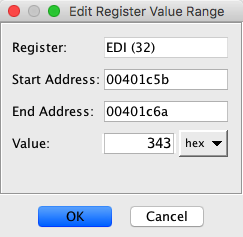
Editing an Address Value Range
Double click on any row in the register value table to bring up the Edit Register Value Range dialog.
Using the dialog, you can adjust the start or end address and/or change the value associated with the range. If you change the start or end address such that the range is smaller, then value associations for address range that was trucated is effectively cleared. For example, in the dialog shown above, if you change the end address to 01001b47 and change the value to 111, then addresses 01001b33 to 01001b47 will have the value 111 and address 01001b48 will have no value.
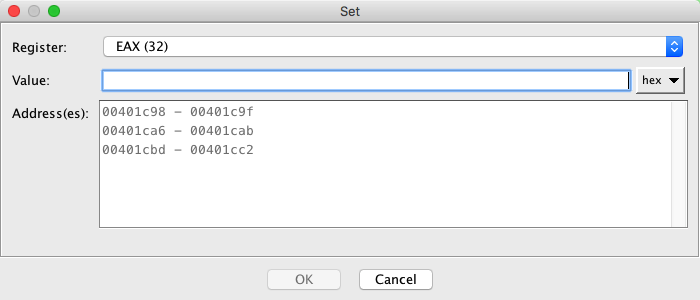
To set a value for a register across an address range, first create a selection in the browser and then invoke the Set Register Values action by either using the right-mouse popup or using the <Ctrl>R quick key. The following dialog appears.
Choose the register for which you want to set a value, enter the value and press the Ok button. The Address(es) field shows the set of addresses that will be affected. By default, the Value field is entered as an unsigned hex value, but the format can be changed using the adjacent drop-down menu.
If the browser cursor is on a register when this dialog is invoked, then the register combo will be set to that register.
To clear a register value over an address range, first create a selection in the browser and then invoke the Clear Register Values action by using the right-mouse popup. The following dialog appears.
Choose the register for the association and press the Ok button. The Address(es) field shows the set of addresses that will be affected.
You can delete associated register values using Delete Register Value Range action when over a Register Transition field in the browser ("assume ESI = 0x20".) Activating this action will remove the register association over the entire range associated with that "Assume" statement.
Provided by: RegisterPlugin