on the tool bar, OR select the option Window Symbol Tree.
The Symbol Tree shows symbols from a program in a hierarchical view. The Symbol tree is organized by the following categories: Externals, Function, Labels, Classes, and Namespaces.
To display the Symbol Tree, select the icon on the tool bar, OR select the option Window![]() Symbol Tree.
Symbol Tree.

The root of the Symbol Tree is the Global namespace. A Namespace defines a scope, such that symbol names are unique within a namespace. The types of namespaces that Ghidra supports are Global, External, Function, Class, and "generic" Namespaces that reside in the global namespace. Every namespace has an associated symbol.
- The Imports category contains symbols that represent external library namespaces which in turn contain anything considered to be "external" to the program such as external locations/functions. The library name "<EXTERNAL>" is reserved to hold those external symbols which have not yet been associated with a specific library.
- The exports category contains symbols that represent exported entry points into the program.
- The Functions category contains symbols that represent functions within the program (excluding external functions). Expand a function symbol to show its parameter and variable symbols.
- All symbols in the Labels category are in the Global namespace.
- The Class category contains class namespaces that may contain function namespaces or label symbols. Class namespaces reside in the global namespace.
- The Namespace category contains generic namespaces that reside in the Global namespace, and may contain class, function, label, or other namespaces.
- The import process creates a namespace (under the Namespace category) for each external library it encounters. (The name is created as _<library name>, e.g., _USER32.DLL, to avoid naming collisions with the external library symbols, under Externals, e.g., USER32.DLL.)
- Based upon the importer capability and/or analysis, external locations or functions may be associated with a Library namespace. You will find these external location/function symbols under the Imports category node.
- Any function node (internal or external) may be expanded to show parameters. In addition, various popup function actions are available to modify the function. An external location may be converted to a function using the Create External Function popup action.
When the label or function category has many elements, the Symbol Tree will show group nodes that represent groups of symbols in order to reduce the "clutter" in the tree. In the sample image above, the Labels category contains a group node (indicated by the
icon). The group node shows the common prefix for all the symbols in the group. The tool tip will display the total number of nodes in the group.
The group nodes can become out of balance if enough symbols are added/deleted/renamed. The entire category can be reorganized by closing and reopening the category node (Functions, Labels). Also, the tree will detect if the organization becomes too far out of balance. In this case, the category node (Functions, Labels) will automatically close. Typically, this would be caused by a long running bulk operation such as analysis. This has the added benefit of speeding up the bulk operation as it will no longer have to keep updating the nodes in the tree.
The Symbol Tree does not show dynamic symbols, i.e., those symbols that are created due to references. Use the Symbol Table display to view dynamic symbols; turn off the filter for user-defined symbols.
Each group below lists operations that can be performed via the Symbol Tree.
You can create a Library name used to refer to a external library. The name can then be associated with a program (or library) to allow navigation or viewing of code. Right mouse click on the Imports folder and choose the Create Library option. A cell editor is displayed in the tree; the name defaults to "NewLibrary." You can change the name, or press the <escape> key to exit the cell editor. If you choose the Create Library option from the root node, the new library name appears in the Imports folder in the tree.
You can Set the External Program associated with a external library. Once the name is associated with a program (or library), external references to a function or address in that library will allow navigation or viewing of code. Right mouse click on the Library node in the Imports folder that you want to associate with a program and choose the Set External Program option. A program chooser dialog is displayed which shows the programs in your project. You can then click on a program to select it and then click on the OK button to associate that program with your named library.
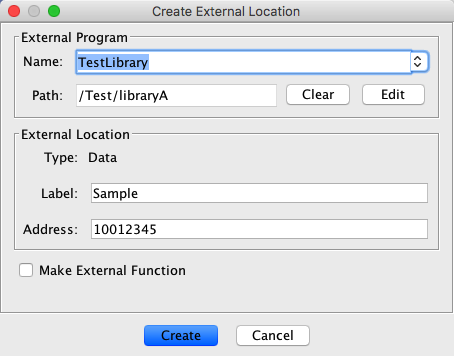
You can create a External Location used to refer to a location or function in a external library. Right mouse click on the Imports node or on a particular library and choose the Create External Location option. If invoked from a specific library node, the External Program Name will default to that library for the location being created. The default library <EXTERNAL> should be used when the library is unknown. Otherwise you can type the name in the field or choose it from the combo box list. The External Program Path, which is the program in the project which corresponds to the named library, will be filled in if there is an associated program in the project. Otherwise, it can be selected via the Edit button, which displays a chooser dialog. Either a Label, an Address, or both must be specified for the External Location. If you check the Make External Function box, then an external function will be created. Otherwise, if you don't check the box, a non-function external location gets created. The ability to associate a data type with the location is not yet supported. Press the Create button to create the external location.
The following dialog shows a external function being created. It will be named "Sample" and is in "TestLibrary" at address 01001234. The library name, TestLibrary, is associated with "libraryA" in the project.
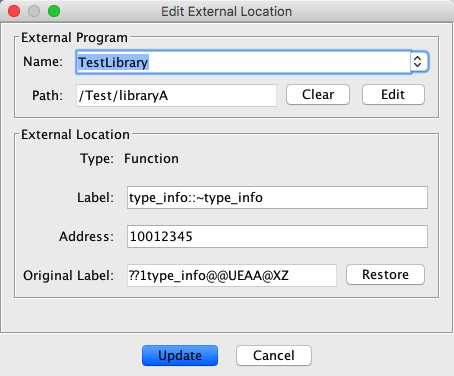
You can edit the external location and associated library details for any External Location symbol within the symbol tree (including locations which have been converted to an external function). Right mouse click on the external location/function node in the symbol tree under Imports and choose the Edit External Location action.
The Edit External Location dialog will default to the current values for the location being edited. You can change the External Program Name in the field or by selecting a different one from the combo box list. The External Program Path, which is the program in the project corresponding to the named library, will be filled in if there is an associated program. Otherwise, it can be selected via the Edit button, which displays a chooser dialog. You can modify the Label and/or Address for the location being edited. Either a Label, an Address, or both must be specified for the external location. Press the Update button to apply your edits to the external location or function.
If the location was initially created by the importer, and was subsequently demangled or changed, the Original Label will be specified. While you can not change this original name, you can revert the location to this label by clicking the Restore button. If the symbol was not an imported symbol or has never been demangled or changed the Original Label and Restore button will not be displayed.
Shows all locations that reference the given symbol.
You can convert a Namespace to a Class. Right mouse click on a namespace and choose the Convert To Class option.
You can create a Class namespace within the Global namespace, or within another namespace. Right mouse click on the parent namespace and choose the Create Class option. A cell editor is displayed in the tree; the name defaults to "NewClass." You can change the name, or press the <escape> key to exit the cell editor. If you choose the Create Class option from the root node, the new class appears in the Class category in the tree. This produces the same result as choosing the option from the Class node. All of the classes in the Class category are in the global namespace.
You can create a namespace within the Global namespace, a Class, or another namespace. Right mouse click on the parent namespace and choose the Create Namespace option. A cell editor is displayed in the tree; the name defaults to "NewNamespace." You can change the name, or press the <escape> key to exit the cell editor. If you choose the Create Namespace option from the root node, the new namespaces appears in the Namespace category in the tree. This produces the same result as choosing the option from the Namespaces node. All of the namespaces in the Namespace category are in the global namespace.
You can rename any symbol by right mouse clicking on the symbol and choose the Rename option. Enter the new name in the cell editor in the tree.
You can reorganize the symbol tree by using drag and drop or cut and paste. The following lists the valid move operations for each symbol type:
- Global namespace Labels can be moved to a class or other namespace; labels can be moved to a function if the address of the label is contained in the function body.
- Labels within a Function namespace can be moved to a class or to another namespace that is not a function namespace.
- Function namespaces can be moved to a class or other namespace.
- Class namespaces can be moved to another namespace.
- Namespaces can be moved to a class or other namespace.
- External library and functions may only be moved to another external Library or associated namespace.
Drag and Drop
To move a symbol, drag symbols and drop on destination symbol. To drag multiple symbols, hold the Ctrl key down to add to the selection, then start dragging the mouse pointer. Release the mouse when the cursor is over the destination node.
Cut and Paste
To use cut and paste menu options, make a selection of symbols to move, right mouse click and select the Cut option; select a destination symbol, right mouse click and select the Paste option.
- Parameters and stack variables within a function cannot be moved.
- The nodes for Functions, Labels, Classes, or Namespaces as a drop site or paste destination is equivalent to the root node (Global), as the Functions, Labels, Classes, and Namespaces are just groupings of function, label, class, and namespace symbols in the global namespace.
- A label in the global namespace can be moved to a function if the label's address is contained in the function body.
To delete a symbol, make a selection of symbols, right mouse click and choose the Delete option.
To make a selection (in the Code Browser) corresponding to selected symbols in the Symbol Tree, right mouse click and choose the Make Selection option. If you select a group node for the Make Selection option, all symbols in that group are selected in the Code Browser.

Navigating to Locations within the Program
The
The Symbol Tree allows you to navigate within the Code Browser when you mouse click on a symbol in the tree. The
Navigating to External Locations
If you select an external symbol (under the Externals folder in the the symbol tree), you will navigate to an external reference source which has a destination corresponding to the external symbol (i.e., where it is being called from). To actually go to the external location, right mouse click on the external symbol and choose Go To External Location.
If the External Program Name associated with the external symbol has not been resolved (i.e., no Program file has been associated with the External Program Name) then a program chooser is displayed. Select a program to be associated with the External Program Name for the selected external symbol. Then this program is opened in the tool and becomes the active program. The current location in this opened program will be set to the location corresponding to the external symbol you had selected.
To include namespace names in the display of labels and names within the Code Browser, select Edit
Tool Options... from the tool menu. This will display the Options dialog. Within the Options tree, navigate to the folder node Listing Fields. The Display Namespace option in the right-hand panel should be checked to include the namespace names within the Listing (see CodeBrowser Options).
Provided By: SymbolTreePlugin