All plugins discovered by Ghidra can be displayed in the Configure dialog for all tools. All known data types are shown in the Data Type Manager display.
The Plugin Path is a preference that indicates where Ghidra should search for Java classes outside of the standard installation locations. User developed Java classes can be used to extend Ghidra with additional plugins and data types.
All plugins discovered by Ghidra can be displayed in the Configure dialog for all tools. All known data types are shown in the Data Type Manager display.
 |
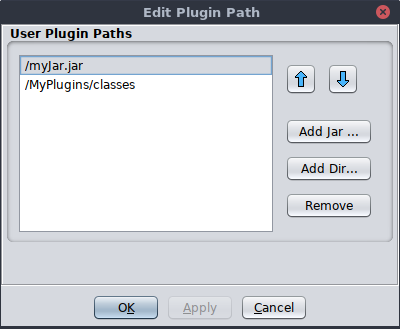
The User Plugin Paths list shows the paths in the order to be searched. Each path is either a directory path or a jar file path. If the path is a directory, then only class files in that directory will be used (not jar files within that directory). If the path is a jar file, then classes within the jar file will be used.
After you make a change to the plugin path, you must restart Ghidra to see the effects.
Add a Plugin Path
To add a Plugin Path,
- From the Ghidra Project Window, select Edit
Plugin Path...
- The Edit Plugin Path dialog is displayed; in the Directory or Jar File Name field
- Select the Add Jar... or Add Dir... button to choose either a jar file or directory from the file system.
- Locate and select the appropriate jar file or directory within the file chooser dialog.
- Select the Add Jar, or Add Dir button within the file chooser dialog.
- Select the Apply or OK button from the Edit Plugin Path dialog.
- Apply applies the changes and leaves the dialog up.
- OK applies the changes and dismisses the dialog.
Change the Search Order
To change the search order of the paths within the User Plugin Path list,
- Select a path from the User Plugin Paths list.
- Select the
button to move the path up in the list; select the
to move the path down in the list.
The search order is important when you have different versions of a plugin in different jar files. The first class that is loaded is the one that you will be using when you run Ghidra.
Remove Paths
- To Remove an existing jar from the Plugin Path,
- From the Ghidra Project Window, select Edit
Plugin Path...
- Select a User Plugin Path.
- Click the Remove Button.
- Click Apply or OK.
- To Remove the User Plugin Jar Directory from the Plugin Path,
- Clear the User Plugin Jar Directory field.
- Select the Apply or OK button.
- Apply applies the changes and leaves the dialog up.
- OK applies the changes and dismisses the dialog.
When you click on the Apply or OK button, your
preferencesfile in your<user settings>folder is updated immediately.
 If you have a tool that
was built with Plugins that came from the paths that you removed, you will get an error
message listing each Plugin that could not be found when you re-open the project or when you
launch that tool.