Ghidra can import a variety of different types of files into a Ghidra project as Ghidra "programs." There are separate actions for importing single files, importing multiple files, and importing a file into an existing program. The actions for importing single or multiple files into a new program are available in both the front-end project window or the CodeBrowser tool. The action for adding to an existing program is only available from the Code Browser tool and only if there is a currently open program in the tool.
- Android APK
- Common Object File Format (COFF)
- Dalvik Executable (DEX)
- Debug Symbols (DBG)
- Dump File Loader
- DYLD Shared Cache
- Executable and Linking Format (ELF)
- Ghidra Data Type Archive File (GDT)
- Ghidra Zip File (GZF)
- Intel Hex
- Java Class File
- Mac OS X Mach-O
- Module Definition (DEF)
- Motorola Hex
- New Executable (NE)
- Old-style DOS Executable (MZ)
- Portable Executable (PE)
- Preferred Executable Format (PEF)
- Program Mapfile (MAP)
- Raw Binary
- Relocatable Object Module Format (OMF)
- XML Input Format
- SARIF Input Format
These actions can be used to import one or more files into a Ghidra project. They can be accessed via the File menu in either the Front-end Project Window or the CodeBrowser Tool unless otherwise specified.
Import File
This action is used to import a single file into Ghidra. If the file is an archive consisting of multiple programs, then this action will bring up the Batch Importer Dialog, otherwise it will use the standard single file Importer Dialog to complete the import.
Steps:
- Invoke the action from the FileImport File... menu item.
- Select the file to import using the filechooser that appears.
- Use the Importer Dialog (or the Batch Importer Dialog if it is an archive) that pops up to perform the import.
- Press OK from the Importer Dialog to perform the import.
- A results summary dialog will appear and, if successful, the new program will appear in the project window and if initiated from a CodeBrowser tool, it will be opened in the tool.
Alternative Steps (drag-and-drop):
- Project Window: Drag a file from the system file explorer application and drop onto the Ghidra Project Tree destination folder. Dropping onto the table view is not supported. In the case of Ghidra Zip File (GZF) or Ghidra Data Type Archive (GDT) file imports, an immediate unpack can be performed wthout a popup dialog if the Front End option Enable simple GZF/GDT unpack is enabled ( EditTool Options...File ImportEnable simple GZF/GDT unpack).
- or Running Tool: Drag a file from the system file explorer application and drop onto a Tool window (e.g., Code Browser Tool).
- The Importer Dialog (or the Batch Importer Dialog if it is an archive) will be displayed to complete the import.
- Press OK to initiate the import.
- A results summary dialog will appear and, if successful, the new program will appear in the project window and if initiated from a CodeBrowser tool, it will be opened in the tool.
Batch Import
This action is used to import multiple files by selecting a root directory and letting it recursively find programs to import.
Steps:
- Invoke the action from the FileBatch Import... menu item.
- Use the filechooser dialog that appears to select a root directory for searching for files to import.
- Use the Batch Importer Dialog that appears to select and configure files for importing.
- Press OK on the dialog to initiate importing the selected files.
- A results summary dialog will appear and, if successful, the new program(s) will appear in the project window. If the action was initiated from the CodeBrowser tool and only a few files were imported, they will be opened in the CodeBrowser tool.
Open File System
This action is used to open the File System Browser which can be used to view the contents of container files (tar, zip, etc.) and import files from within those containers.
Steps:
- Invoke the action from the FileOpen File System... menu item.
- Use the dialog that appears to browse the contents of the container file and import files as desired.
Add to Program
This action is used to import data from a file into an existing program. The program must be open in the tool to perform this action.
Steps:
- Invoke the action from the FileAdd to Program... menu item.
- Use the filechooser dialog that appears to select a root directory for searching for files to import.
- Use the Importer Dialog to configure the import.
- Press OK on the dialog to initiate importing the selected files.
- When the import is complete, the currently open program should have additional data in it.
Import Selection
This action is used to import a selection from an open program in the CodeBrowser tool.
Steps:
- Make a selection in the Listing window in the CodeBrowser tool.
- Invoke the action by right-clicking and from the popup menu, select the Extract and Import... menu item.
- Use the Importer Dialog to configure the import.
- Press OK on the dialog to initiate importing the selected files.
- When the import is complete, a new program will appear in the project window and also be opened in a new tab in the Listing Window.
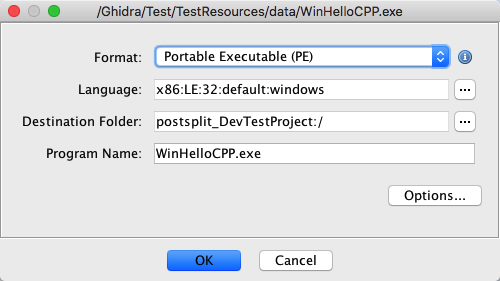
When the user initiates a single file import, the Importer Dialog is used to configure the import for that file.
Dialog Fields
- Format - This field is a drop-down list containing all the valid file formats that could be used to to import the file. Typically, there are two options available. One for the actual format of the file (if Ghidra could detect it) and other is the Raw Binary format, which is always an option regardless of the actual file format and it will simply import the bytes in the file without any interpretation.
- Language - This field specifies the language/compiler specification that will be used in the resulting program. Often, this will be automatically detected from the file format. The Language/Compiler Spec Chooser Dialog can be used to enter or change the language/compiler spec that will be used.
- Destination Folder - This field is used to specify the destination folder within the current project for where the newly imported program will be saved. If a folder is selected in the front-end project window, then this field will default to that folder, otherwise the root folder will be the default. The ... will bring up a dialog for changing the destination folder.
- Program Name - This field specifies the name for the newly imported program. By default, it will be the name of the imported file with any format specific extenstion removed (e.g., .xml, .gzf). Path information at the beginning of the this field will be used to create a destination folder in the current project under the root folder specified by the Destination Folder field.
- Options... - This button will pop up format specific options for the import.
If this dialog appears as a result of the Add To Program action, then the Language, Destination Folder, and Filename fields will be disabled since these values are already determined by the existing program.
The import options differ depending on the selected format.
Common Options
These options appear in many of the standard executable program formats such as ELF, PE, etc.
Apply Processor Defined Labels
If this option is on, the importer will create processor labels at specific addresses as defined by the processor specification. This is usually used to label things like the reset vector or interrupt vector.
Anchor Processor Defined Labels
If this option is on, labels created from the processor specification are anchored. This means that if the image base is changed or a memory block is moved, those symbols will remain at the address they were originally placed. If the option is off, the symbols will move with the image base or the memory block.
Link Existing Project Libraries
Searches the project for existing library programs and creates external references to them.
Project Library Search Folder
The project folder that will get searched for existing library programs. If left empty, the folder that the main program is being imported to will be searched.
Load Libraries From Disk
Searches a user-defined path list to recursively resolve the external libraries used by the executable. The entire library dependency tree will be traversed in a depth-first manner and a program will be created for each found library (if it doesn't exist already). The external references in these program will be resolved.
The "Edit Paths" button will bring up the Library Paths DialogRecursive Library Load Depth
Specifies how many levels deep the depth-first library dependency tree will be traversed when loading local or system libraries.
Library Destination Folder
The project folder where newly loaded library programs will get created. If left empty, they will get created in the same folder as the main program being imported.
COFF Options
COFF format has all the Common Options, plus:
Attempt to link sections located at 0x0
If selected, sections located at 0x0 will be relocated sequentially in memory. This will avoid conflicts and keeps sections from being ignored.
ELF Options
ELF format has all the Common Options, plus:
Perform Symbol Relocations
If selected, Ghidra will attempt to apply the relocations specified in the ELF header.
Image Base
Specifies the image base to use for importing the memory sections.
Import Non-loaded Data
If selected, Ghidra will import ELF sections that don't get loaded into memory when the program is run. These sections will not be stored in a special address space called "other".
Max Zero-Segment Discard Size
When both section-headers and program-headers are present, this option controls the maximum byte-size of a non-section-based memory block which has a zero-fill which will be discarded. This is intended to allow section-alignment load sequences to be ignored and discarded. A value of "0" will disable all such discards. The default value is 255-bytes.
Intel Hex Options
Base Address
This field is used to specify the start address in memory for where to load the bytes.
Overlay
If selected, the bytes will be loaded as an initialized overlay block. A new overlay space will be created with the same name as the Block Name.
Block Name
This field is used to specify the name of the memory block that will contain the newly imported bytes.
Mach-O Options
The Mac OSX Mach-O format has only the Common Options.
Motorola Hex Options
Base Address
This field is used to specify the start address in memory for where to load the bytes.
Overlay
If selected, the bytes will be loaded as an overlay. A new overlay space will be created with the same name as the Block Name.
Block Name
This field is used to specify the name of the memory block that will contain the newly imported bytes.
MZ Options
The MZ format has only the Common Options.
NE Options
The NE format has all the Common Options, plus:
Perform Library Ordinal Lookup
Looks up and applies pre-generated exported symbol ordinal name mappings and stack purge information. This information is stored in symbol files located in
<GHIDRA_INSTALL_DIR>/Ghidra/Features/Base/data/symbols/<OS>
.If there is no pre-generated information for a given library but the ordinal name mappings and/or stack purge information is extracted during the library load/analysis process, the information will be cached locally to the user's
.ghidra/
directory to speed up future imports.PE Options
The PE format has all the Common Options, plus:
Perform Library Ordinal Lookup
Looks up and applies pre-generated exported symbol ordinal name mappings and stack purge information. This information is stored in symbol files located in
<GHIDRA_INSTALL_DIR>/Ghidra/Features/Base/data/symbols/<OS>
.If there is no pre-generated information for a given library but the ordinal name mappings and/or stack purge information is extracted during the library load/analysis process, the information will be cached locally to the user's
.ghidra/
directory to speed up future imports.When running Ghidra with symbol files created from an older operating system, you may receive the following warning message:
Unable to locate [
symbol_name
] in [<filepath>.exports
]. Please verify the version is correct.This warning message indicates which symbols do not exist in the corresponding .exports file. The only information lost by not including these symbols is function purge and comments. If you require this information, manually delete the .exports file and Ghidra will regenerate it.
Parse CLI headers (if present)
If selected, any CLI headers present will be processed.
Raw Binary Options
Block Name
The name of the memory block that will contain the raw bytes from the file. By default, it will be the name of the default address space (usually "ram")
Base Address
This field is the address offset for the block of bytes to be imported. By default, this will be 0.
File Offset
This field is the byte offset into the imported file from which to start importing raw bytes. By default, this will be 0.
Length
This field is the number of bytes to import. By default, this will be set to the total number of bytes in the imported file.
Apply Processor Defined Labels
If this option is on, the importer will create processor labels at specific addresses as defined by the processor specification. This is usually used to label things like the reset vector or interrupt vector.
Anchor Processor Defined Labels
If this option is on, labels created from the processor specification are anchored. This means that if the image base is changed or a memory block is moved, those symbols will remain at the address they were originally placed. If the option is off, the symbols will move with the image base or the memory block.
XML Options
The XML format is used to load from a Ghidra XML formatted file. The options are simply switches for which types of program information to import.
Memory Blocks
Imports memory block definitions (name, start address, length, etc). See Memory Map
Memory Contents
Imports bytes for the memory blocks.
Instructions
Imports disassembled instructions. See Disassembly.
Data
Imports data types and defined data. See Data Type Manager and Data.
Symbols
Imports user-defined symbols. See Symbol Table.
Equates
Import equate definitions and references. See Equate Table.
Comments
Imports comments (pre, post, eol, plate, repeatable). See Comments.
Properties
Imports user-defined properties.
Bookmarks
Imports Bookmarks.
Trees
Imports program organizations (program trees, modules, fragments). See Program Tree.
References
Imports user-defined memory, stack, and external references. See References.
Functions
Imports functions, stack frames and variables. See Functions.
Registers
Imports program context and registers. See Register Values.
Relocation Table
See Relocation Table.
Entry Points
Imports program entry points.
External Libraries
SARIF Options
The SARIF format is used to load from a SARIF formatted file. The options are simply switches for which types of program information to import and are identical to the options specified above for XML.
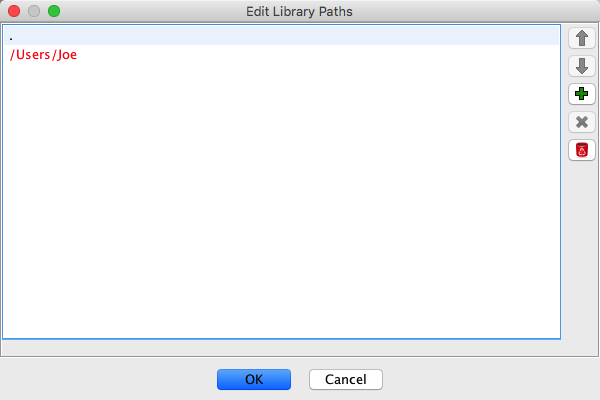
The Library Search Path dialog is used to specify the directories, container files, and/or FSRLs that Ghidra should use to resolve external libraries (e.g.; *.dll, *.so) while importing. A "." can be added to specify the the program's import location. FSRLs can be added via the File System Browser context menu.
Change the Library Path Search Order
To change the search order of the paths within the list:
- Select a path from the list
- Select the button to move the path up in the list
- Select the button to move the path down in the list
The search order is important when you have different versions of a libraries in different directories. The first directory in the search path that contains a required library is the one that Ghidra will use.
Add Library Search Path
- Click the button
- Select a directory or container file from the file chooser, or the program's import location if "." is not present in the list already
- Click the "Select Directory" button
The newly added path will be placed at the top of the list.
Remove Library Search Path
- Select one or more paths from the list
- Click the button
Reset Library Search Paths
To reset the paths to the default list:
- Click the button
- Click "Yes" on the pop-up dialog to confirm path reset
This option will remove any paths added manually.
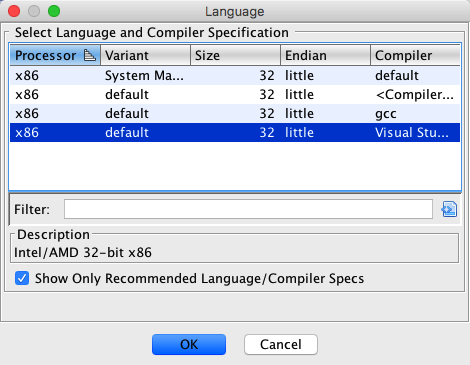
This dialog is used specify of the Ghidra language (Processor/Compiler Spec) of the program being imported. Certain formats, like "PE", "ELF", or "XML", will usually choose the appropriate language/compiler spec. If not, this dialog can be used to select one or override the default selection.
Each row in the table represents a unique processor language/compiler spec pair. To select one, simple click on the row and press the OK button.
Table Columns
- Processor - The processor for this selection
- Variant - Some processors have different versions of the processor. The primary variant is called "default". Any other variants should have a meaningful name
- Size - the size in bits of the processor address space
- Endian - the endianness of the processor
- Compile - the compiler specification used to build the program
Filter
The filter can be used to reduce the number of entries in the table. Only the entries that contain the text in this field will be displayed.
Description
This field shows the currently selected language/compiler spec.
Show Only Recommended Language/Compiler Specs
If selected, only the languages suggested by the selected importer format will be shown. Otherwise, all known languages will be shown. Not all importer formats can determine an appropriate language, in which case all the languages will be displayed.
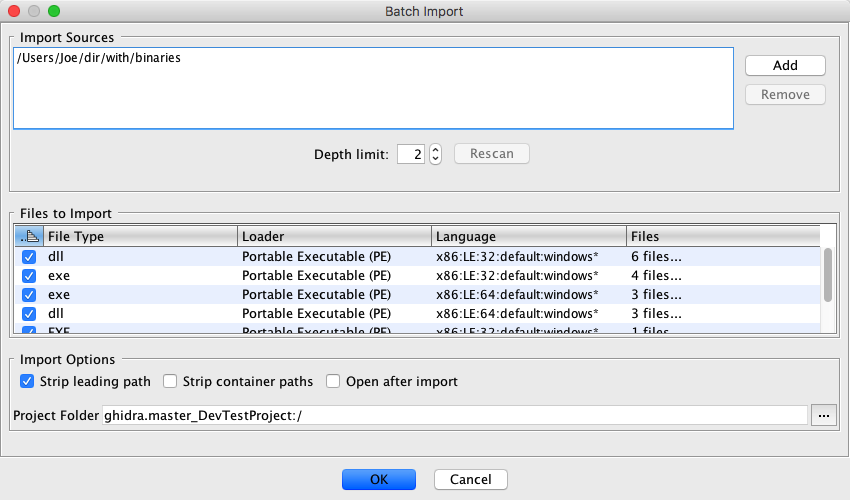
The Batch Import Dialog is used to import multiple files at the same time. The files may be individual files in a directory tree, and/or files from an archive file of some sort such as a zip or tar file.
Import Sources
This section manages a list of folder trees or container files (e.g., zips) to scan for files to import. Initially, this contains the folder or file that was initially selected from the file chooser.
Adding an additional import source folder.
Pressing the Add button will bring up a file chooser for picking an additional folder or file (import source) to search for import files
Removing an import source folder
Select a folder in the import sources window and press the Remove button.
Depth limit
This field specifies the depth or level of nested containers to search for each of the specified import sources. Note that this is not the level of subfolders to search, but rather the nesting levels of archive type files. (i.e. zips in zips)
Rescan
This button will rescan the import sources to the current depth for files to import.
Files to Import
This section displays a table showing the files that were found. Each row represents a set of similar files that can be imported. The table columns are as follows:
- <checkbox> - if checked, this set of files will be imported.
- File Type - displays the file extension
- Loader - displays the format (Loader) that will be used to import the file.
- Language - displays the language that will be used (if applicable). Clicking on this field will pop up a list of acceptable languages to choose from.
- Files - displays the number of files in the group. Clicking on this field will pop up a list of the files in the group.
Import Options
Strip leading path
If selected, the newly imported files will not use the relative path of the file when storing the result in the project. Otherwise, the file will be in a corresponding relative path in the project.
Strip container paths
If selected, the newly imported files will not use the interior archive path when storing the result in the project. Otherwise, the file will be in a corresponding relative path to the path the file was in its archive.
Project Destination
This shows the destination folder in the project that will be the root folder for storing the imported files. Each imported file will be stored in a relative path to that root folder. The relative path is usually the relative path of the file to its import source folder, but can be adjusted with some of the path options described earlier.
Provided By: Importer Plugin