Tool Connections
Ghidra Tools that share data and interact dynamically are said to be connected.
Tools are connected via tool events. Tools generate events when
you:
- open or close a Program
- move the cursor to a different location in the Program
- make a selection in the Program (drag
the mouse over some addresses).
A main reason to connect tools is to have one tool track Program location or selections in
another tool.
A tool may generate events that only another tool of this type can process, e.g., the Code Browser in one tool produces and consumes an edit event
that is appropriate for a Code Browser in another tool. Thus, tools can be connected for only
those events that they have in common.
Tool connections are directional. You can connect two Tools A and B in a single
direction such that Tool A generates an event consumed by Tool B; however, Tool A will not
consume any events generated by Tool B. You can also connect Tools A and B such that the
connections are bi-directional, where Tool A generates an event consumed by Tool B, and
Tool B generates an event consumed by Tool A.
The following sections describe the ways to connect tools.
Automatic Tool Connection
You automatically connect tools when you:
- drag the icon for one running tool onto another running tool, OR
- drag the icon from the Tool Chest onto the
icon for the running tool.
The tools are connected in both directions for all events (all Tool A events will be
consumed by Tool B, and all Tool B events will be consumed by Tool A). For example, if you
move the cursor in Tool A, the location change is reflected in Tool B. Conversely, if you
move the cursor in Tool B, the location change is reflected in Tool A.
 Drag and drop tool
icons is the quickest way to connect two tools.
Drag and drop tool
icons is the quickest way to connect two tools.
Manual Tool Connection
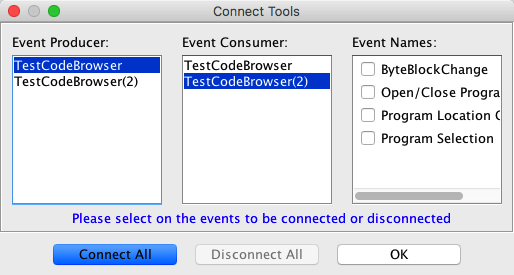
Connecting Tools
You manually connect tools by selecting the Tools Connect
Tools... option from the Ghidra Project
Window.
Connect
Tools... option from the Ghidra Project
Window.
- To connect two tools in one direction for a specific event,
- Select a tool in the Event Producer list (for example Tool A).
- Select a tool in the Event Consumer list (for example Tool B).
- Select the check box for the event of interest in the Event Names list.
Only the consumer tool will respond to the event generated by the producer tool.
- To connect two tools in both directions for a specific event,
- Connect the tools in one direction as described above.
- Select Tool B as the event producer and and Tool A as the event consumer.
- Select the check box for the event of interest in the Event Names list.
 When you select a
check box for an event, the connection is established immediately. The OK button
dismisses the dialog, as does selecting the
When you select a
check box for an event, the connection is established immediately. The OK button
dismisses the dialog, as does selecting the  button. There is no "cancel" associated with connecting
tools.
button. There is no "cancel" associated with connecting
tools.
The manual connection
is useful only if you want to control specific events between the tools. From the
Connect Tools dialog, the easiest way to connect all tools for all events is to
click on the Connect All button. This action will connect tools in both directions,
just as though you had dragged and dropped the tool icons to do the automatic connection. Conversely, disconnect all tools
for all events by clicking on the Disconnect All button.
Some Notes on
Connecting Tools:
- Because of the basic premise of connections, connected Tools should have the same
program opened. For
example, tracking program locations between two tools each showing a different program
will probably not be very useful.
- Tools running in different workspaces
may be connected. Even though tools may not be visible because they are not in your
active workspace, they can still be connected to tools that are running in other
workspaces.
Disconnect Tools
- To disconnect tools for a specific event,
- Select a tool in the Event Producer list (for example Tool A).
- Select a tool in the Event Consumer list (for example Tool B).
- Turn off the check box for the event of interest.
The consumer tool will no longer respond to that event.
- To disconnect two tools in both directions for a specific event,
- Disconnect the tools in one direction as described above.
- Select Tool B as the event producer and and Tool A as the event consumer.
- Turn off the check box for the event of interest in the Event Names list.
- To disconnect all tools for all events, click on the Disconnect
All button.
When you deselect a
check box for an event, the connection is terminated immediately.