The options for archiving
and restoring a project will show up only in the Ghidra Project window, even though the plugins
providing these options can be added to other tools.
The options for archiving
and restoring a project will show up only in the Ghidra Project window, even though the plugins
providing these options can be added to other tools.The Project Window is displayed when you run Ghidra. From this window, you manage your projects, workspaces, Programs, and tools. If you are running Ghidra for the first time, you will need to create a new project to get started.
The Project Window is a tool and may be configured with "special" plugins that provide general capabilities that may be required at a high level. By default, the Project Window contains plugins for importing and exporting Programs, archiving a project, and restoring an archived project. These plugins may be added to other tools.
The options for archiving
and restoring a project will show up only in the Ghidra Project window, even though the plugins
providing these options can be added to other tools.

The following sections describe the Project Window:
The Tool Chest shows the tools that you currently have in your <user home dir>/.ghidra/.ghidra-<version>/tools folder. The tools are placed there when you initially install Ghidra. These tools are always available to your currently open project. See Ghidra Tool Administration for information on managing tools. The Tool Chest panel is a tool bar with an icon that represents each tool in your Tool Chest.
You can launch a tool by clicking on the icon. You can launch a tool with a Program by dragging a Program file from the Project data tree and dropping it on the tool icon in the Tool Chest.
The Active Project view shows your programs and datatype archives in a tree view or a table view. The tree view is useful for organizing your files into folders and sub-folders. The table view is useful for sorting all your files on some particular attribute such as size, processor, or modification date. In either view, you open and perform various actions on program files or datatype archives.
Project Data Tree
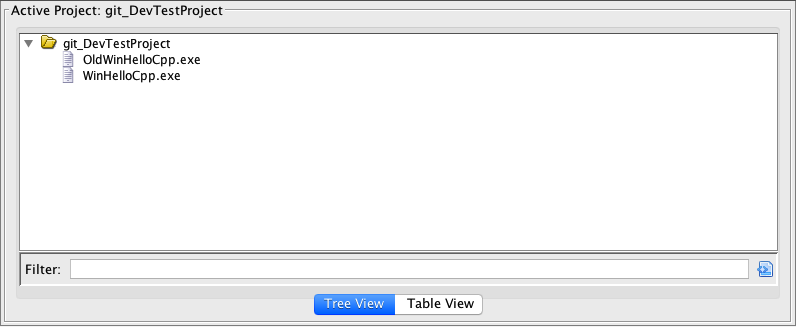
The data tree shows all files in the project orgnanized into folders and sub-folders. Icons for files indicate whether they are under version control and whether you have the file checked out. Open this view by activating the "Tree View" tab.
Tree Only Actions
The data tree supports the following operations:
Create New Folder
To create a new folder,
- Select a folder that you own.
- Right mouse click and choose the New Folder option.
- A new node is created in the tree; a cell editor is displayed, containing the default name, New Folder; enter a new name, or the <Escape> key to cancel the editing.
Copy Folders and Files
To copy folders and files to another folder that you own,
- Select a file or folder; you may also select multiple folders and files.
- Right mouse click and choose the Copy option.
- Select a destination folder.
- Right mouse click and choose the Paste option. For very large files, an "in progress" dialog is displayed. You may cancel the paste operation at any time.
Move Folders and Files
To move folders and files to another folder that you own,
- Select a file or folder; you may also select multiple folders and files.
- Right mouse click and choose the Cut option; the icon will change to a dithered image to indicate the cut operation.
- Select a destination folder.
- Right mouse click and choose the Paste option.
Drag/Drop for Copy
You can get the same effect of Copy/Paste using Drag and Drop.
- Select a folder or file (or multiple folders and files).
- Hold the Ctrl key down and drag the object to another folder.
- Drop the object on a folder.
Drag/Drop for Move
You can get the same effect of Cut/Paste using Drag and Drop.
- Select a folder or file and drag it to a folder that you own.
- Release the mouse button when you get a valid drop target.
Expand/Collapse
To expand a folder and all of its descendant folders,
- Select a folder.
- Right mouse click and choose the Expand All option.
To collapse a folder and all of its descendant folders,
- Select a folder.
- Right mouse click and choose the Collapse All option.
Project Data Table
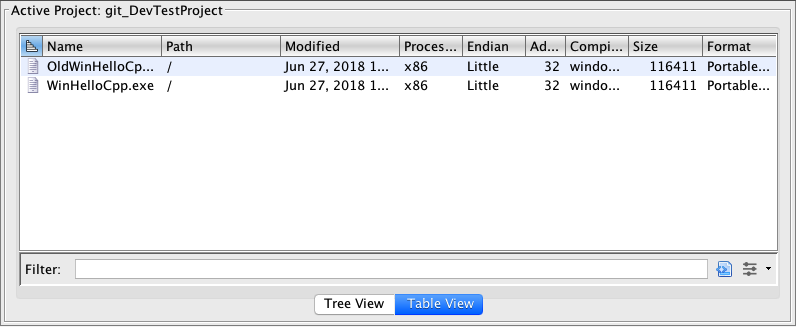
The data table shows all files in the project in a table sorted by some attribute of the file. In the example above, the files are sorted on file type. Icons for files indicate whether they are under version control and whether you have the file checked out. To open this view, active the "Table View" tab.
Actions for Both the Data Tree and the Data Table
Delete
Deleting folders is a recursive operation, so all descendant folders and files are also deleted. This is a permanent operation. To delete a folder or file,
- Select the folder or file or select multiple folders and files.
- Right mouse click and choose the Delete option.
Rename
To rename a folder or file,
- Select the folder or file.
- Right mouse click and choose the Rename option.
- A cell editor is displayed; enter the new name.
Duplicate names are not allowed within the same folder.
Select All
To select a folder and all of its descendants,
- Select a folder.
- Right mouse click and choose the Select All option.
Read-Only
To mark a file as read only,
- Select a file.
- Right mouse click and choose the Read-Only option.
The icon for the file is updated to indicate the read only state. When you right mouse click, a check mark shows up in the Read-Only option.
Drag File to a Tool
- To launch a tool with a specific file, drag a file to the tool icon in the Tool Chest.
- To open a file in a running tool, drag a file to the tool icon in the Running Tools tool bar, OR drag the file to the tool window.
Open a File in the Default Tool
- To open a file in the tool that was specified as the "default," double click on the Program that you want to open, OR right mouse click on the file and choose Open in Default Tool. Either a new tool will be launched or an existing running tool will be reused based upon the Tool option setting (see Front-End Tool Options.
Open a File With a Specific Tool
- To launch a tool with a specific file,
- Select the file.
- Right mouse click and choose Open With
<tool name>.
Refresh
The
button on the tool bar refreshes the list of files in the selected folders. This is a way to sync the project folder/file structure with the project repository. The list of files and folders in the Project Data Tree is updated. This button is enabled only for selected folders. You can also refresh folders from a viewed project or viewed repository.
About
To view information about a file, right mouse click on the file in the data tree and choose the About Program option.
There are numerous actions related to version control. See Project Repository for details.
The Project Data Tree shows icons for the following types of files:
-
A program
-
A project data type archive (a data type file stored in the project)
The Project Data Tree shows modifications to these icons for files in the following states:
| File Status | Sample Icon | Description |
|---|---|---|
| Versioned File not checked out. | 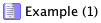 |
The program named "Example" is versioned as indicated by the light purple background. It is not checked out , since there is no circle with a check mark. Version 1 is the latest version, as indicated by "(1)"; the version will be the latest version when the file is not checked out. |
| Versioned File is Checked out exclusively by you. |  |
Version 1 of the program named "Example" is checked out, as indicated
by "(1 of 1)"; Version 1 is the latest version. The blue check mark icon indicates
that the file is checked out with an exclusive lock. If your project is not associated with a Ghidra Server, you will always have the latest version checked out and the check out will always be exclusive, since the project is not shared. |
| Versioned File is Checked Out; the project is associated with a Ghidra Server |  |
Version 3 of the program named "Example" is checked out; Version 3 is the latest version on the server, as indicated by "(3 of 3)" and the green circle with a check mark. The asterisk indicates you have changes to the file which have not been checked in yet. |
| Versioned File is Checked Out; the project is associated with a Ghidra Server. A newer version exists on the server. |  |
Version 2 of the program named "Example" is checked out; a Version 3 has been created since Version 2 was checked out, as indicated by "(2 of 3)" and the magenta circle with a check mark. The asterisk indicates you have changes to the file which have not been checked in yet. |
| Private File |  |
A program named "Example" is not under version control, exists only on your local machine, and is not visible to other users. |
| Hijacked File |  |
The private file "Example" exists on your computer, but another user added "Example" to version control, which caused the private file to appear as hijacked, (i.e., the file can be saved "as is" using "Save As" since you do not have the the file checked out that is on the Ghidra Server.) Hijacked files may also result from a checkout that was terminated. The shared version of "Example" will not be visible in your project until you undo the hijack. You can also either rename the hijacked "Example", move it to another folder, delete it, or use the Undo Hijack action. Then the shared "Example" will appear in your data tree as a versioned file. |
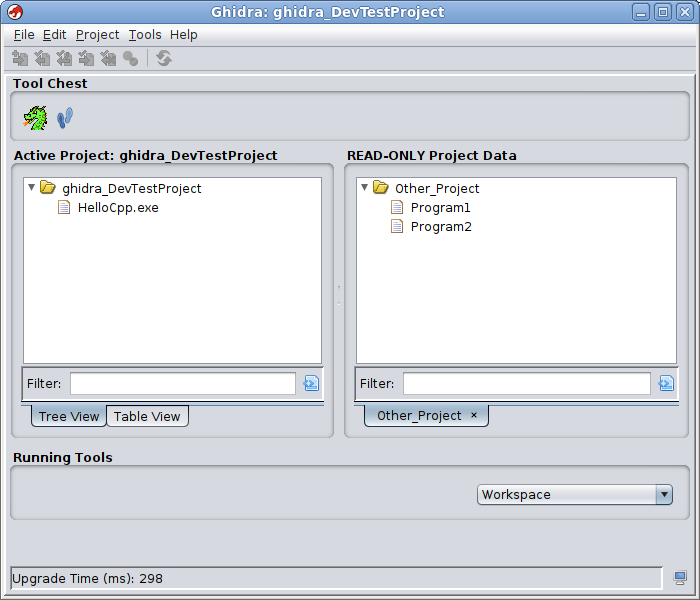
You can view data from other Projects or remote Repositories and copy data into your current Project's data folders.
View Other Projects
To view the data from another project:
- Select Project
- A file chooser is displayed; the default location is the projects folder in the installation folder.
- Choose a project; the file extension is "gpr."
- A new tab for the data tree is created in the "READ-ONLY Project Data" panel in the Project Window, next to the Active Project panel; the tab shows the name of the project.
- The list of recent projects menu is updated to include this project.
 |
You can copy and paste folders (via menus or drag and drop) and files from the other view to your folders.
You do not have to hold the Ctrl key down when you drag from the other view since this cannot be a move operation, as this view is always read-only.
View a Shared Project
You view a shared project the same way you would a non-shared project; the difference is that when you view the shared project, an attempt is made to connect to the Ghidra Server associated with that project. Depending on the user authentication mode of the Ghidra Server for the other shared project, you may have to enter a password. If the connection to the Ghidra Server is unsuccessful, then the only files available to you are your private files.
View a Repository
To view the data from a server-based repository:
- Select Project
- A repository chooser is displayed; allowing you to specify a Ghidra Server network address and select one of its repositories...
- Enter the Ghidra Server address and port. The default port is 13100.
- Click the Refresh button to the right of the host name and port fields. This will connect to the specified Ghidra Server and list available repositories for which you have been granted access. You may be prompted for a password should user authentication be needed.
- Select the desired repository from the list of those available.
- Click the Select Repository button. A new tab for the data tree is created in the "READ-ONLY Project Data" panel in the Project Window, next to the Active Project panel; the tab shows the URL of the remote repository.
- The list of recent projects/repositories menu is updated to include this repository.
View Recent
Ghidra maintains a list of Projects and remote Repositories that were recently viewed.
To view a recently opened project or repository,
- Select Project
- Select a project or repository from the menu.
- If the project/repository is not in the view, a new tab is created in the "READ-ONLY Project Data" panel in the Project Window; the tab shows the name of the project or repository URL.
- If the tab is in the view, then the tab for this project/repository is selected.
Close View
To close a view, select Project
The tab is removed from the "READ-ONLY Project Data" panel in the Project Window.
Close All Read-Only Views
To close all read-only views at once, select Project
The tabbed pane for read-only Project data is removed from the Project Window.
Create Linked Folder or File
This feature allows you to create a folder or file link in your active project to a corresponding folder or file within a read-only viewed project. This is done using a Ghidra URL which references the file in its local or remote storage location. If the viewed project corresponds to a viewed repository a remote URL will be used, while other cases will refer to the locally viewed project. It is possible for links to become broken if the referenced repository, local project or file location are changed.
- Select a single folder or file from a viewed READ-ONLY Project Data tree.
- Right mouse click on the selected tree node and choose the Copy option.
- Select a destination folder in the active project tree.
- Right mouse click on the folder and choose the Paste as Link option.
A linked-file may be opened in a tool via the project window in the same fashion that a normal file is opened (e.g., double-left-mouse-click or drag-n-drop onto a tool box icon). Such a project file may also be opened within a Tool using its File->Open... action and selected from the resulting project file selection dilaog. Clicking on a linked-folder in the active project window will open that location in a READ-ONLY Project Data tree. The user may be prompted for a shared repository connection password when accessing a linked folder or file.
Within a project file chooser dialog a linked-folder may be expanded in a similar fashion to local folders provided any neccessary repository connection can be completed.
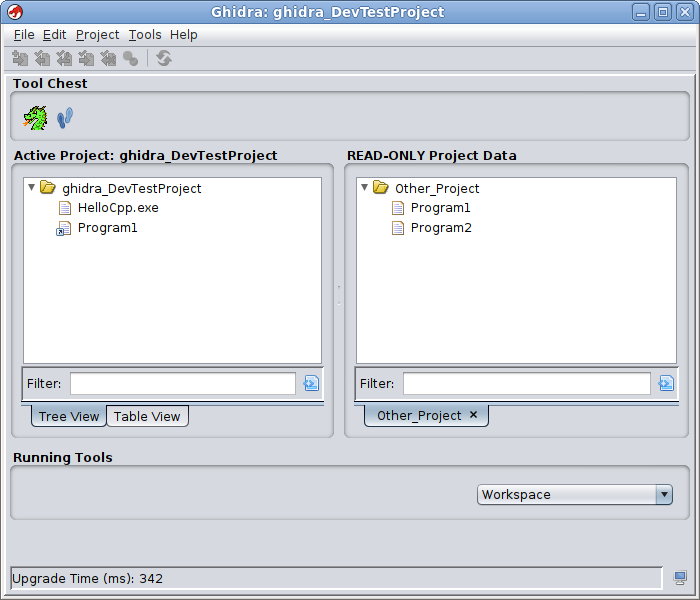
The project window below shows a Program file-link "Program1" which is linked to the same file in the viewed project. Hovering the mouse over a linked-file will show the URL of the linked file or folder. The chain-link icon decoration indicates such a linked file or folder.
A workspace contains a set of running tools, and the tools' opened data. A workspace is analogous to a virtual desktop. When you switch to another workspace, you switch to a different set of running tools. The tools from the other workspace remain running, but are not visible until you switch back to that workspace.
The workspace names are listed in a combo box in the Running Tools panel. Switch to another workspace by choosing a name from the list. The default workspace, named "Workspace," is created in the project.
The workspace state, i.e., running tools, tool connections, tool configuration, etc., is maintained when you exit Ghidra or close the Project.
- Select Project
- A dialog is displayed; enter a new workspace name. Duplicate workspace names are not allowed.
- Click on the OK button; the newly created workspace becomes the current workspace; the name is added to the list of workspaces in the combo box.
- Select Project
- A dialog is displayed.
- Enter the new name for the current workspace. Duplicate workspace names are not allowed. The list of workspace names is updated to reflect the new name.
- Select Project
- A dialog is displayed to confirm your delete request.
- Choose the Delete button to delete the workspace.
- Tools in the workspace are closed.
- If you made changes to a file that is not open in any other tool, a dialog will be displayed to prompt you to save your changes.
- The oldest workspace becomes the current workspace. If the deleted workspace was the last one, then the default workspace ("Workspace") becomes the current workspace.
- Select Project
- Switches sequentially through the list of workspaces (in creation order), wrapping back to the first after the last has been reached.
- For example: WS1, WS2, WS3, then WS1.
- If only 1 workspace exists, this action will do nothing.
The Running Tools panel shows an icon for each tool that is running in the current workspace. Click on the icon to bring that tool forward on your console. To close the tool from the Running Tools panel, right mouse click on the icon for the tool and choose the Close option.
To connect running tools, drag one icon onto another icon. Those tools are connected for all tool events.
If your project is associated with a Ghidra Server, then below the Running Tools panel you will see a connection status panel that shows the name of the Project Repository, your access privileges, and an indication of whether you are currently connected to the Ghidra Server. The status button,
indicates that your project repository is connected to the Ghidra Server; the status button,
indicates that your project repository is associated with a Ghidra Server but it is not connected to it.
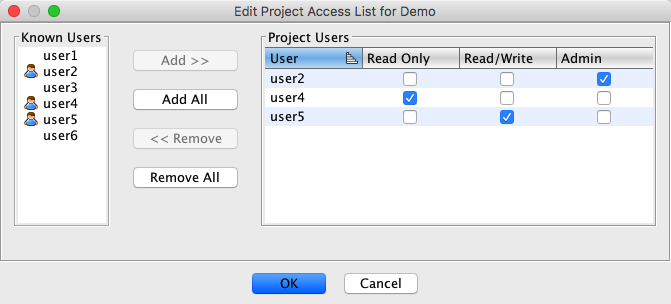
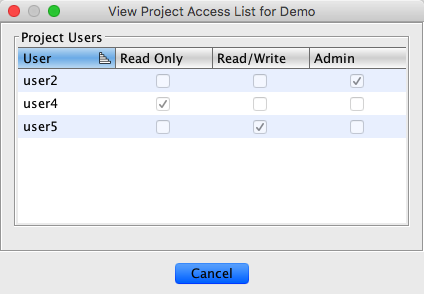
If your project is shared, the Project menu has an option to edit the project access list. This list controls what users have access to the project and what privileges the users have. If you have administrative privilege in the project, the option for Project
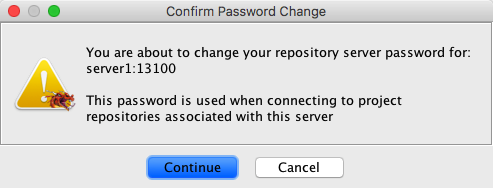
If your project is associated with a Ghidra Server that is using Ghidra password authentication, then the menu item, Project
If you select Continue, a dialog is displayed for you to enter your new password, and to re-enter your password.

Click on the console icon
Log messages, including the standard output and error streams, are redirected to the console. If you are running Ghidra in development mode (i.e., through Eclipse or some other IDE), you will see standard output and errors in your IDE's console as well as the Ghidra console.
Errors and other informational messages are logged to a file in <user home>/.ghidra/ghidraUser.log. Messages are appended to the file every time you launch Ghidra. Once the log file has reached 500KB in size, however, it will be rolled to a backup file named ghidraUser.log.0. Older backup files are similarly rolled to another file with a one-up digit suffix as well. Ghidra stores a maximum of three backup files (ghidraUser.log.0, ghidraUser.log.1, ghidraUser.log.2) at a time. The log files can be used by Ghidra developers for troubleshooting.
The field next to the icon in the Ghidra Project Window shows the last message sent to the console (error messages are in red).
Context Sensitive Help
- Ghidra provides context sensitive help that pops up when you hit the <F1> or <Help> key.
To get help on a menu option,
- Display the menu (either from the tool menu or the popup) that has the option you want help on.
- Position the mouse pointer over the option.
- Press the <F1> or <Help> key.
- The Help Viewer is displayed and shows the appropriate help contents.
- To get help on a dialog or tool window, click somewhere in that window and press the <F1> or <Help> key.
If no specific help exists, then a default page for Ghidra help is displayed.
About Ghidra
The About Ghidra option shows build information about the Ghidra application.