Project Information provides project-level information and functionality:
|
|
Project Location |
Repository Information |
Functionality |
|
Non-Shared Project |
x |
|
Convert to Shared Project |
|
Shared Project |
x |
x |
Change the server or repository associated with the project |
To access Project Information, select Project![]() View Project Info... from the Ghidra Project Window. The image below shows information and
functionality for a shared project:
View Project Info... from the Ghidra Project Window. The image below shows information and
functionality for a shared project:
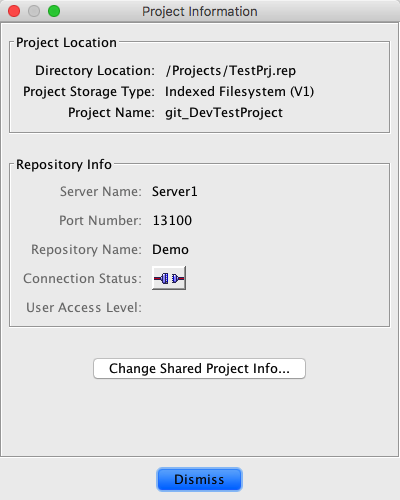
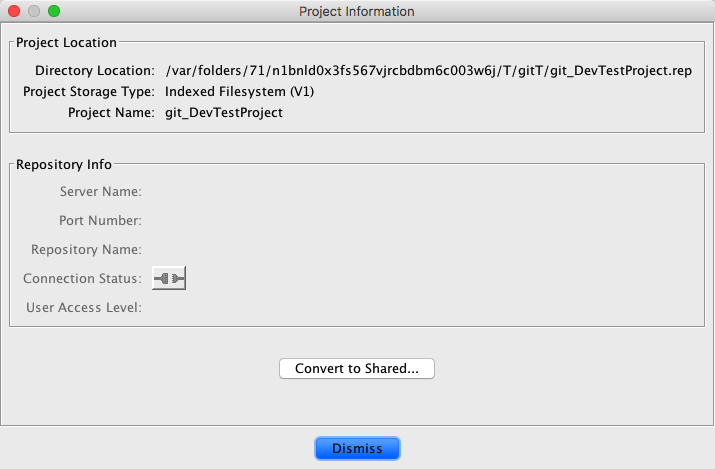
The Project Location shows the directory where your project resides, the type of project storage (the legacy Mangled Filesystem or the newer Indexed Filesystem), and the name of your project.
The Repository Info shows the name and port number of the Ghidra Server and the name of the repository associated with your project.
The connection button indicates whether you are
connected to the server. (If you were connected, the button would show as  You can click on the button to attempt to
connect to the server.)
You can click on the button to attempt to
connect to the server.)
The User Access Level indicates your privileges in the project (Administrator, Read Only, or Read/Write). The User Access Level is only displayed while in a connected state.
 As
of version 5.5 Ghidra utilizes
an Indexed Filesystem for storage of project files, however, projects created prior to version 5.5
utilize a Mangled Filesystem. The Mangled Filesystem uses a name mangling scheme for files
and folders while preserving the folder hierarchy within the actual storage. Unfortunately, this
can result in IO errors due to native filesystem limits on filename and absolute file path length
which can easily be exceeded under MS Windows. The Indexed Filesystem
implementation attempts to avoid these length limitations by utilizing an index file to record
the folder hierarchy while a shallow non-hierarchical storage is used for project files. When attempting to
locate the a file database, the folder path and item name can be found within an items associated
property file (*.prp) as separate property values.
As
of version 5.5 Ghidra utilizes
an Indexed Filesystem for storage of project files, however, projects created prior to version 5.5
utilize a Mangled Filesystem. The Mangled Filesystem uses a name mangling scheme for files
and folders while preserving the folder hierarchy within the actual storage. Unfortunately, this
can result in IO errors due to native filesystem limits on filename and absolute file path length
which can easily be exceeded under MS Windows. The Indexed Filesystem
implementation attempts to avoid these length limitations by utilizing an index file to record
the folder hierarchy while a shallow non-hierarchical storage is used for project files. When attempting to
locate the a file database, the folder path and item name can be found within an items associated
property file (*.prp) as separate property values.
If your project currently uses the older Mangled Filesystem for data storage, a one-way conversion to an Indexed Filesystem may be done by clicking the Convert Project Storage to Indexed... button which should appear near the bottom of the Project Information window.
Changing shared project details may become neccessary when a server's IP address or name has changed. While other cases are supported, these may cause some issues with private and checked-out project files. Any checked-out file which does not match-up properly will be renamed to a private .keep file within the project and a checkin will no longer be possible. In addition, when switching to and a different repository private files may conflict with those in the repository resulting in hijacked files.
To update repository information:
- Close all open files. Closing all of your active tools (e.g., CodeBrowser) may be the simplest way to accomplish this.
- In Project Information, click on the Change Shared Project Info... button to start the Change Shared Project Information wizard.
- The Change Shared Project Information wizard displays the project's current server name and port number. If desired, use this panel to change the server name and/or port number.
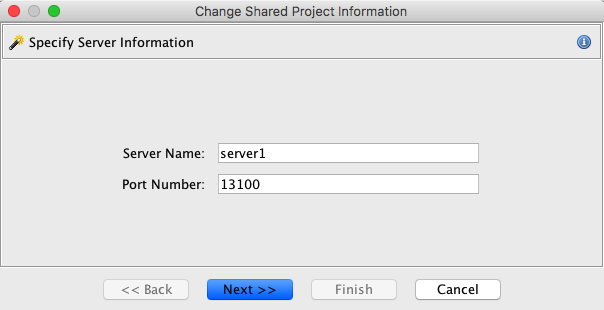
Press the Next >> button to connect to the specified server and port.
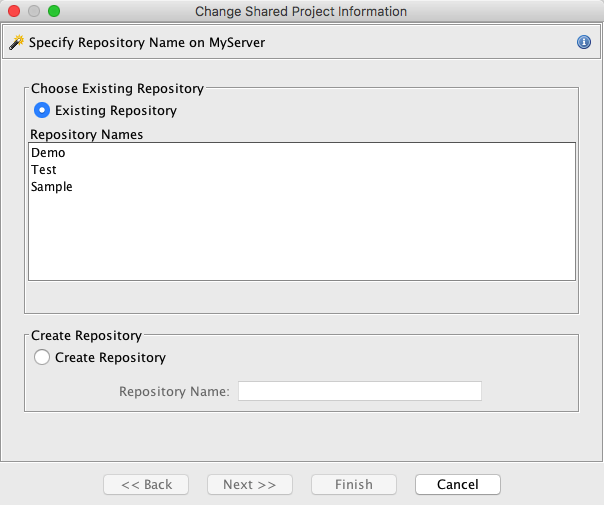
Once connected to the specified server and port, the Change Shared Project Information wizard displays repository information. By default, the Existing Repository radio button is selected because of the existing repositories found on the server.
- To use an existing repository, leave the radio button selected, and select a repository name from the list of Repository Names.
- To create a new repository, select the Create Repository radio button; the Repository Name field becomes enabled. Enter the name of the new repository.
- Press the Next>> button. If you selected the Create Repository radio button, then the following sample Project Access panel, which specifies user access, is displayed. If you are creating a new shared repository, you are by default the Administrator in the project. You are not allowed to change your access.
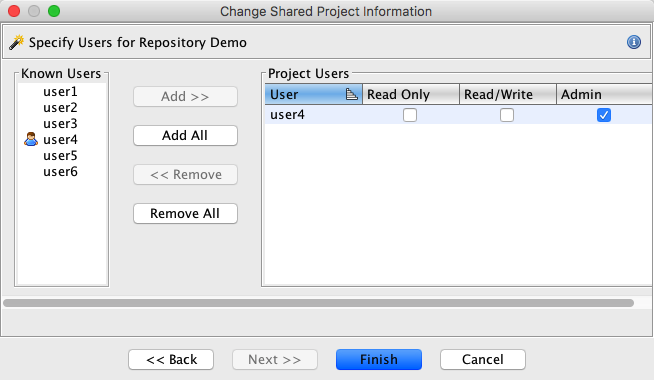
- Users that are known to the server are listed in the Known Users area. Users that are part of the project are marked with the
icon. To add users, select users from Known Users, select the Add>> button. Add all users by selecting the Add All button. To remove users, select users in the project, and select the <<Remove button. To remove all users (except yourself), select the Remove All button. The Project Users table on the right side of the dialog indicates user privileges.
Edit Project Access List... option.
If one or more checked-out files do not match-up properly with the new repository you will be prompted to allow these checkouts to be terminated and converted to private .keep files. Such file conversion will prevent such files from ever being checked-in and should be avoided when possible. Click Terminate Checkouts and Continue to proceed with change or Cancel to abort change. The conversion of these files to private .keep files can not be undone.
The image below shows project information for a project that is not shared. Note that the repository information will not be displayed for a private project. If repository information is displayed this is already a shared project.
Before you can convert your project, you must first close any files that you have opened. Closing all of your active tools (e.g., CodeBrowser) may be the simplest way to accomplish this.
You can convert your non-shared project to a shared project by clicking on the Convert to Shared... button.
The steps to converting your project are the same as those described for Change Shared Project Information. However, at Step 9 above you will get a dialog that warns you about losing version history on versioned files. From the warning dialog, click on the Convert button to complete the conversion process.